使用 TypeScript + Rect + WebPack 编写模块化工程
- TypeScript 语言规范
- Rect、WebPack 介绍
- TypeScript + Rect + WebPack 开发示例
TypeScript 语言规范
TypeScript is a typed superset of JavaScript that compiles to plain JavaScript. Any browser. Any host. Any OS. Open source.
一些 modern language (吸收了 C C++ Lisp Haskell Pascal 等语言的优点,21 世纪之后出现的语言) 的一个功能是把 ECMAScript (JavaScript 语言标准) 作为目标代码。编写非 ECMAScript 代码,通过编译器生成 ECMAScript 代码。
+------------+      +----------+      +------------+
| lang codes | ---> | compiler | ---> | ECMAScript | ===> run in Browser or (JS) VM
+------------+ +----------+ +------------+- Nim
- Rust
- Kotlin
- Crystal
- TypeScript
- …
TypeScript 与其他语言不同之处在于:
- 保持和 JavaScript 相同的语法和语义
- 可以直接使用已有的和将来出现的 JavaScript 代码
- 提前实现 ECMAScript 2015 (6) 和 ECMASCript 7 规范
- 微软提供了丰富的工具:vscode 调试器和编辑器
一些补充
TypeScript 和 JavaScript 这种编译方式不是独有的。GCC 编译 C 代码不是直接生成机器码,而是生成汇编代码,然后借用汇编代码的编译器生成机器码。C++ 早期的目标代码是纯 C 代码。Nim、Kotlin 这两个新出现的语言,也使用了类似的技术。Nim 的目标代码是纯 C,可以和 C 互相调用。Kotlin 的目标代码是 JVM 字节码,可以和 Java 互相调用。
这样做的目的,大多是希望发明新的语言,来提升编程效率、性能,并且保留对旧有代码库的兼容和支持。
使用 TypeScript 的好处
- 不需要学习新的语法和语义
- 可以直接使用 JavaScript 库,编写的代码可以为 JavaScript 调用,你仍然可以和不懂 TypeScript 的一起协作
- 提供静态的类型检查,获得只有静态语言才有的类型安全,并且支持类型推导
- 模块化,抽象化 — 构建大型工程的基石
- 提前使用 ECMAScript 2015 (6) 和 ECMASCript 7 规范
一个介绍
npm install -g typescriptBuiltin types
number
var a = 1
var b: number = 100
var c = -1.1

var d: number // 声明 (绑定符号 Symbol),分配内存空间
d = 1.1e10    // 赋值 (查找符号表,修改符号绑定的内存空间)
string
var a = "a"
var b: string = "hello"

var c: string      // 声明
c = "hello world"  // 赋值
boolean
var a: boolean = true var b = false if (true) { console.log("Hello world!") }objectvar a = {name: "XiaoMing", age: 21} typeof a === "object" var b = Object.create(null) b.name = "Tom" class Person { public name: string } var c = new Person() c.name = "Lili" typeof c === "object"null和undefinednull和undefined是其他任何类型的子类型。但是,通常最好不使用undefined,除非没有更好的选择。对于null,当你使用object的类型时,当没有赋值的时候,可以选择赋予null值。var a = null var b: null = null var c: string = null // 声明,赋予 `null`,表示只申请了 c 地址的内存 c = "abc" // 分配一块内存存储 `abc`,将这个地址赋予 cvoid
function f(): void {
console.log(100)
}

function g() {
console.log(100)
}
any
忽略类型检查,相当于直接编写 ECMAScript
var a: any = 100
var c: any = "abc"
var e: any = {name: "Tom"}
Array
var a = [1,2,3,4,5,6]
var b: Array<number> = [1, 2, 3]

var c: Array<string> = []
c[0] = "hello"
c[1] = "world"
tuple
事实上,TypeScript 对于 tuple 的设定非常简陋和粗糙,缺少语义的表示。tuple 是一个数据领域用来表示一个数据项的标准格式。TypeScript 使用一个固定数组表示:
var a = ["Tom", 21, "red"]

var b: [string, number, string]
b = ["XiaoMing", 31, "blue"]
使用范例:
var persons: Array<[number, string, number]> = [] persons.push(["Tom", 21, "red"]) persons.push(["XiaoMing", 31, "blue"]) persons.push(["Lili", 22, "yellow"])+------------+-----+------------+ | name | age | likedColor | +------------+-----+------------+ | "Tom" | 21 | "red" | | "XiaoMing" | 31 | "blue" | | "Lili" | 22 | "yellow" | +------------+-----+------------+更合格的 tuple 声明(Nim 语言):
var a = ("Tom", 21, "red")
var b: tuple[name: string, age: int, likedColor: string] = ("XiaoMing", 31, "blue")
type Person = tuple name: string age: int lokedColor: string var persons: array[Person, 3] = [] # 有 3 个 Person 的数组,体现语义 persons.add(("Tom", 21, "red")) persons.add(("XiaoMing", 31, "blue")) persons.add(("Lili", 22, "yellow"))语义的价值:不使用注释,就可以看明白代码的含义。
tuple unpack (拆包,ECMAScript 2015 规范):
var [a, b, c] = [1, 2, 3]
a === 1
b === 2
c === 3
enum
枚举,常用在算法表示各个状态:
enum Color {
RED, GREEN, BLUE
}

var a: Color = Color.RED

switch (a) {
case Color.RED:
// do something
break
case Color.GREEN:
// do something
break
case Color.BLUE:
// do something
break
default:
break
}
class types
class Person { public name: string public age: number public likedColor: string protected createDate: Date constructor(name: string, age: number, likedColor: string) { this.name = name this.age = age this.likedColor = likedColor this.createDate = new Date() } public changeLikedColor(likedColor: string) { this.likedColor = likedColor } public print() { this.pringLine() console.log(this.name + " age: " + this.age + " likedColor: " + this.likedColor) console.log("created at: " + this.createDate.toLocalString()) this.pringLine() } protected printLine() { console.log("---------------------------") } } var person = new Person("XiaoMing", 31, "blue") person.changeLikedColor("cyan") person.print()<hr /> XiaoMing age: 31 likedColor: cyan created at: ...... <hr />
Class
function Person(name, age, likedColor) {
  this.name = name
  this.age = age
  this.likedColor = likedColor
  this.createDate = new Date()
}

Person.prototype.changeLikedColor = function (likedColor) {
  this.likedColor = likedColor
}

Person.prototype.print = function () {
  this.printLine()
  console.log(this.name + " age: " + this.age + " likedColor: " + this.likedColor)
  console.log("created at: " + this.createDate.toLocalString())
  this.printLine()
}

Person.prototype.printLine = function () {
  console.log("---------------------------")
}
继承
学生 (也是一个 Person,多了学校) :
function Studen(name, age, likedColor, school) { Person.call(this, name, age, likedColor) this.school = school } function F() { } F.prototype = Person.prototype Studen.prototype = new F() // util.inherits(Person, Studen) Studen.prototype.print = function () { Person.prototype.print.call(this) console.log("school: " + this.school) Person.prototype.print.printLine() }<hr /> XiaoMing age: 31 likedColor: cyan created at: ...... <hr /> school: STF <hr />[Person] <---------+ +--------> [Person.prototype] <---+ name +-----|--------- constructor | age | __proto__ | likedColor | changeLikedColor() | created | print() | prototype -----------+ printLine() | __proto__ -> [Function.prototype] | | | [F] +--------> [F.prototype] ---------+ prototype | __proto__ | | | [new F()] | __proto__ -----------+ ^ | +------------------------------------------------------+ | | | [Studen] +--------> [Studen.prototype] -+ school | constructor prototype -----------+ __proto__ -> [Object.prototype] __proto__ | print() | | [new Studen()] | school | __proto__ -----------+class Studen extends Person { private school: string constructor(name: string, age: number, likedColor: string, school: string) { super(name, age, likedColor) this.school = school } public print() { super.print() console.log("school: " + this.school) this.printLine() } }abstract class
抽象类用于放置共同方法和数据(不能使用 new 实例化):
abstract class Shape {
public x: number
public y: number
public color: string

public draw(ctx) {
  ctx.draw(this.x, this.y, 100, 100, this.color)
}

abstract print(): void
}

class Rect extends Shape {
public print() {
  console.log("A Rect")
}
}

class Line extends Shape {
public print() {
  console.log("A Line")
}
}

var rect = new Rect()
rect.draw()
rect.print()

var line = new Line()
line.draw()
line.print()
Interface
Interface 常常用在纯面向对象语言,解决纯面向对象语言不支持 Function 但是多态的问题。考虑以下绘图场景:
class Rect {
  public x: number
  public y: number
  public w: number
  public h: number

  constructor(x: number, y: number, w: number, h: number) {
    this.x = x
    this.y = y
    this.w = w
    this.h = h
  }

  public draw(ctx) {
    ctx.rect(this.x, this.y, this.w, this.h)
  }

  public print() {
    console.log("A Rect")
  }
}

class Circle {
  public x: number
  public y: number
  public r: number

  constructor(x: number, y: number, r: number) {
    this.x = x
    this.y = y
    this.r = r
  }

  public draw(ctx) {
    ctx.arc(this.x, this.y, this.r)
  }

  public print() {
    console.log("A shape")
  }
}

class Container {
  private shapes: Array<?>
  private ctx: Canvas2DCtx

  constructor() {
    this.ctx = ...
  }

  public add(shape: ?) {

  }

  public draw() {
    for (var shape of this.shapes) {
      ?
    }
  }
}

var container = new Container()
container.add(new Rect(0,0,100,100))
container.add(new Circle(100,100,100))
container.draw()
Interface 作为一个通用方法容器的声明:
interface Shape {
  draw(ctx): void
  print(): void
}

class Rect implements Shape {
  public x: number
  public y: number
  public w: number
  public h: number

  constructor(x: number, y: number, w: number, h: number) {
    this.x = x
    this.y = y
    this.w = w
    this.h = h
  }

  public draw(ctx) {
    ctx.rect(this.x, this.y, this.w, this.h)
  }

  public print() {
    console.log("A Rect")
  }
}

class Circle implements Shape {
  public x: number
  public y: number
  public r: number

  constructor(x: number, y: number, r: number) {
    this.x = x
    this.y = y
    this.r = r
  }

  public draw(ctx) {
    ctx.arc(this.x, this.y, this.r)
  }

  public print() {
    console.log("A shape")
  }
}

class Container {
  private shapes: Array<Shape>
  private ctx: Canvas2DCtx

  constructor() {
    this.shapes = []
    this.ctx = ...
  }

  public add(shape: Shape) {
    this.shapes.push(shape)
  }

  public draw() {
    for (var shape of this.shapes) {
      shape.print()
      shape.draw(this.ctx)
    }
  }
}

var container = new Container()
container.add(new Rect(0,0,100,100))
container.add(new Circle(100,100,100))
container.draw()
用 abstract 可以达到同样效果:
abstract class Shape {
  abstract draw(ctx): void
  abstract print(): void
}

class Rect extends Shape {
  public x: number
  public y: number
  public w: number
  public h: number

  constructor(x: number, y: number, w: number, h: number) {
    this.x = x
    this.y = y
    this.w = w
    this.h = h
  }

  public draw(ctx) {
    ctx.rect(this.x, this.y, this.w, this.h)
  }

  public print() {
    console.log("A Rect")
  }
}

class Circle extends Shape {
  public x: number
  public y: number
  public r: number

  constructor(x: number, y: number, r: number) {
    this.x = x
    this.y = y
    this.r = r
  }

  public draw(ctx) {
    ctx.arc(this.x, this.y, this.r)
  }

  public print() {
    console.log("A shape")
  }
}

class Container {
  private shapes: Array<Shape>
  private ctx: Canvas2DCtx

  constructor() {
    this.shapes = []
    this.ctx = ...
  }

  public add(shape: Shape) {
    this.shapes.push(shape)
  }

  public draw() {
    for (var shape of this.shapes) {
      shape.print()        // 多态应用场景
      shape.draw(this.ctx) // 多态应用场景
    }
  }
}

var container = new Container()
container.add(new Rect(0,0,100,100))
container.add(new Circle(100,100,100))
container.draw()
区别在于 abstract class 不能多继承:
class Rect extends Shape, Boardinterface 允许多继承:
class Rect implements Shape, Board正如开头所说的,interface 最开始用于纯面向对象语言(不支持 Function)。所以有其设计的局限和问题,对于 TypeScript 这种支持 Function 的语言,应该尽量减少对 interface 的使用,使用 abstract class。对于多态(比如形状,可能有方形、圆形、三角形,而你想要在一个平面上把它们依次绘制出来。你想要一个数组或者表把它们存储起来),尽可能使用 Function 或者泛型来解决。
abstract class 通常能表示一个放置公共数据和方法的地方,而 interface 则没有任何语义,仅仅是为了应对语言的类型兼容。过度使用 interface 只会使得代码拧在一块,业界对于面向对象的批评多来与此(以及类继承)。
Generic
一个(非循环)双向链表的例子:
   +-----+   +-----+   +-----+   +-----+   +-----+   +-----+
<->|node1|<->|node2|<->|node3|<->|node4|<->|node5|<->|node6|<->
   |-----|   |-----|   |-----|   |-----|   |-----|   |-----|
   |value|   |value|   |value|   |value|   |value|   |value|
   +-----+   +-----+   +-----+   +-----+   +-----+   +-----+
class Node<T> {
public next: Node<T>
public prev: Node<T>
public value: T
constructor(value: T) {
this.next = null
this.prev = null
this.value = value
}
public add(node: Node<T>) {
/*
prev<-[this]->next
null<-[node]->null
*/
if (this.next === null) {
this.next = node
node.prev = this
} else {
this.next.prev = node
node.next = this.next
node.prev = this
this.next = node
}
}
public del() {
/*
prev<-[this]->next
*/
if (this.prev !== null) {
this.prev.next = this.next
this.prev = null
}
if (this.next !== null) {
this.next.prev = this.prev
this.next = null
}
}
}
interface Rect {
x: number
y: number
w: number
h: number
}
var node1 = new Node<Rect>({
x: 100, y: 100, w: 100, h: 100
})
var node2 = new Node<Rect>({
x: 200, y: 200, w: 100, h: 100
})
node1.add(node2)
var node3 = new Node<Rect>({
x: 300, y: 300, w: 100, h: 100
})
node2.add(node3)
// <->node1<->node2<->node3
var node = node1
while (node !== null) {
var rect = node.value
alert(`${rect.x}, ${rect.y}, ${rect.w}, ${rect.h}`)
node = node.next
}
alert('del node2')
node2.del()
// <->node1<->node3
var node = node1
while (node !== null) {
var rect = node.value
alert(`${rect.x}, ${rect.y}, ${rect.w}, ${rect.h}`)
node = node.next
}var a: Array<number> = []
a.push(100)
a.push(200)
a.push(300)
var b: Array<string> = []
b.push('a')
b.push('b')
b.push('c')
var c: Array<{name: string, age: number}> = []
c.push({
name: 'XiaoMing',
aget: 31
})
c.push({
name: 'Tom',
age: 21
})function f<T: number|string>(x: T) {
if (typeof x === 'number') {
console.log("x is number")
} else if (typeof x === 'string') {
console.log("x is string")
} else {
throw new Error("invalid type")
}
}
f(1) // x is number
f("hello") // x is string
f(null) // Error: invalid type泛型可以帮助你正确的编程,使你避免错误,并且利于代码维护
Iterators and Generators
(inline) 迭代器就是循环的抽象,避免局部变量无意被修改
function * f() {
  yield 100
  yield 200
}

for (var v of f()) {
  console.log(v)       // 100 200
}
function * f(x: Array<number>) {
for (var i = 0, len = x.length; i < len; i++) {
if (x[i] % 2 === 0) {
yield x[i]
}
}
}
for (var a of [1,2,3,4,5,6]) {
console.log(a) // 2 4 6
}var node = node1
while (node !== null) {
var rect = node.value
alert(`${rect.x}, ${rect.y}, ${rect.w}, ${rect.h}`)
node = node.next
}
function * eachNode<T>(firstNode: Node<T>): Iterable<Node<T>> {
var node = firstNode
while (node !== null) {
yield node
node = node.next
}
}
for (var node of eachNode(node1)) {
var rect = node.value
alert(`${rect.x}, ${rect.y}, ${rect.w}, ${rect.h}`)
}
class Node<T> {
// ...
public * eachNode(): Iterable<Node<T>> {
var node = this
while (node !== null) {
yield node
node = node.next
}
}
}
for (var node of node1.eachNode()) {
var rect = node.value
alert(`${rect.x}, ${rect.y}, ${rect.w}, ${rect.h}`)
}还有一种使用方法叫做 (closure) 迭代器 — 协程的底层机制:
function* f(x: Array<number>) {
  for (var i = 0, len = x.length; i < len; i++) {
    if (x[i] % 2 === 0) {
      yield x[i]
    }
  }
}

var arr = [1,2,3,4,5,6]
var g = f(arr)

var ret = g.next()
ret.value === 2
ret.finish === false

console.log('hello')

var ret = g.next()
ret.value === 4
ret.finish === false

console.log('hello')

var ret = g.next()
ret.value === 6
ret.finish === false

console.log('hello')

var ret = g.next()
ret.finish === true
Promise and async await
例子
async await 是 yield 的语法糖 — 一个预处理器。虚拟机编译成字节码之前对其进行翻译处理。
Go-lang:
go func() {
  time.Sleep(1e9)
  timeout <- true
}()

switch {
  case <- ch:
    // 从ch中读取到数据

  case <- timeout:
    // 没有从ch中读取到数据,但从timeout中读取到了数据
}
C#
class Program {
  static async void AsyncMethod() {
    Console.WriteLine("开始异步代码");
    var result = await MyMethod();
    Console.WriteLine("异步代码执行完毕");
  }

  static async Task<int> MyMethod() {
    for (int i = 0; i < 5; i++) {
      Console.WriteLine("异步执行" + i.ToString() + "..");
      await Task.Delay(1000); //模拟耗时操作
    }
    return 0;
  }

  static void Main(string[] args) {
    AsyncMethod();
    Thread.Sleep(1000);
    Console.ReadLine();
  }
}
Nim-lang
proc processMessages(server: Server, client: Client) {.async.} =
  while true:
    let line = await client.socket.recvLine()
    await sleepAsync(1000)
    echo(client, " sent: ", line)
    for c in server.clients:
      if c.id != client.id:
        await c.socket.send(line)

waitFor server.processMessages(client)
Crystal
def worker(&block)
  result = UnbufferedChannel(Exception?).new

  ::spawn do
    begin
      yield
    rescue ex
      result.send(ex)
    else
      result.send(nil)
    end
  end

  result
end

def pool(size, &block)
  counter = 0
  results = [] of UnbufferedChannel(Exception?).new

  loop do
    counter += 1

    while counter < size
      results << worker { yield }
    end

    result = Channel.select(*results)
    if ex = result.receive
      puts "ERROR: #{ex.message}\n#{ex.backtrace.join("\n")}"
      counter -= 1
      results.delete(result)
    end
  end
end

pool(5) { helper_method(1, 2, 3, 4) }
C++ boost coroutines
typedef coro::coroutine<boost::tuple<int, int>(int)> coroutine_type;

boost::tuple<int, int> muladd_body
  (coroutine_type::self& self,
   int val) {
  int prod = 0;
  int sum = 0;
  while(true) {
    prod += val;
    sum  += val;
    val = self.yield(boost::make_tuple(prod, sum));
  }
}

coroutine_type muladd(muladd_body);

template<typename ValueType>
class generator : public std::iterator<std::input_iterator_tag, ValueType> {
  typedef shared_coroutine<ValueType()> coroutine_type;
public:
  typedef typename coroutine_type::result_type value_type;
  typedef typename coroutine_type::self self;

  generator() {}

 generator(const generator& rhs) :
    m_coro(rhs.m_coro),
    m_val(rhs.m_val) {}

  template<typename Functor>
  generator(Functor f) :
    m_coro(f),
    m_val(assing()) {}

  value_type operator*() {
    return *m_val;
  }

  generator& operator++() {
    m_val = assing();
  }

  generator operator++(int) {
     generator t(*this);
     ++(*this);
     return t;
  }

  friend operator==(const generator& lhs, const generator& rhs) {
    lhs.m_val == rhs.m_val;
  }
private:
  boost::optional<vale_type> assign() {
    try {
      return m_coro? m_coro() :  boost::optional<value_type>();
    } catch (coroutine_exited) {
      return boost::optional<value_type>()
    }
  }

  coroutine_type m_coro;
  boost::optional<value_type> m_val;
};
Module
等同于 ECMASCript 2015
import * as fs from 'fs'

import {readFile, writeFile} from 'fs'

import {App} from './app'

export var a = 1

export function f() {

}

export class F {

}
更多
编译 TypeScript 的三种方式
编译选项参考 Compiler Options
CLI
tsc  src/test_generator.ts --target ES6

tsc  --project src --target ES6 --module commonjs --removeComments --jsx react
使用 tsconfig.json
project
  |
  |- tsconfig.json
  |- src
  |- dist
  |- node_modules
  |- docs
{ "compilerOptions": { "module": "commonjs", "removeComments": true, "allowJs": true, "experimentalDecorators": true, "target": "es6", "noImplicitAny": true, "sourceMap": true, "jsx": "react", "rootDir": "./src", "outDir": "./dist" }, "exclude": [ "node_modules", "docs" ] }tsc --project . # project/使用 gulp
  "devDependencies": {
    "gulp": "^3.9.1",
    "gulp-sourcemaps": "^1.9.1",
    "gulp-typescript": "^3.1.4",
    "typescript": "^2.1.5"
  },
var gulp = require('gulp') var typescript = require('gulp-typescript') var sourcemaps = require('gulp-sourcemaps') var path = require('path') var tsconfig = require('./tsconfig.json') const BASE_DIR = path.join(__dirname, 'src') const DIST_DIR = 'dist' function compileMain(pathname) { return function () { return gulp .src(pathname, { base: BASE_DIR }) .pipe(sourcemaps.init()) .pipe(typescript(tsconfig.compilerOptions)) .pipe(sourcemaps.write('.')) .pipe(gulp.dest('dist')) } } gulp.task('build', compileMain('src/**/*.ts'))gulp build
WebPack 介绍
WebPack 是一个最近开始流行的 Browser 模块化工具,把你所编写的 Browser JS 代码合并到一个文件,并自动赋予命名空间,使其具备模块化的功能。这样,你就可以编写模块化的 Browser JS 代码。
React 多数情况用于 Browser 的 HTML 渲染,所以我们这里使用 WebPack 组织 JS 代码。
更多的 WebPack 信息参考 WebPack IO
WebPack 正在变的臃肿和反 JS 标准。WebPack 试图推出一个新的编程结构,但是又不制作新的编程语言,所有的编写都是用 JS 写的,但是却完全修改了 JS 标准(或者准标准)库的许多语义。如果你使用这些语义编写代码,多年之后,这些代码很容易导致:其他程序员看不懂,JS 标准不认可,业界不愿意支持(微软、Google 没有任何一个认为 WebPack 搞得这些东西可以成为一个标准)。
最佳实践是只使用 WebPack 的打包工具,如同使用 Browserify,只用它的编译过程,其他的不要过问。这同时能甩开 WebPack 庞大臃肿的文档说明:只看你需要的内容,而且这部分内容很小。
target
WebPack 打包的时候有几种方式,
target指定目标环境。主要有web、nodejs、electron、…target不同,则打包时一些变量和包的导入规则也不同。output
输出的目标文件路径
externals
有些引用的外部包,比如
react、jquery,不想要把它们一起打包进自己的代码(这样代码会很大,而且打包过程很慢)。externals可以指定一个键值对,忽略打包的这些模块。resolve
应该扫描那些格式的文件,进行打包。
module.loaders
这是 WebPack 提供的插件机制。loaders 可以提供各种不同语言的打包插件,比如
js、css、ts等等。…
{
  target: 'web',
  output: {
    filename: path.join(path.dirname(pathname).replace(/^\.?\/?src\/?/, ''), path.basename(pathname, '.tsx') + '.js')
  },
  externals: [
    {
      'react': 'React',
      'react-dom': 'ReactDOM',
      'react-channel': 'ReactChannel'
    }
  ],
  resolve: {
    extensions: ['', '.tsx'],
  },
  devtool: 'source-map',
  module: {
    loaders: [
      {
        test: /\.tsx$/,
        loader: "ts-loader",
        exclude: /node_modules/
      }
    ]
  }
}
TypeScript + React + WebPack
不使用 MVVM 的时代,模板引擎
JavaScript 历史上存在很多模板引擎:ejs、hogan、mustache、…,这些模板引擎只做一个任务:把数据动态的渲染到字符串模板中,生成一个需要的字符串。这也说明,模板引擎是数据驱动的。
关于数据和解释器:
有必要提前说明数据和解释器。
Unix-like 风格的客户端和服务器之间传输数据,数据到达后,如何解释数据是两端自己的事情,双方只制定传输数据的内容格式和几个标识。这样的好处是可以面向数据编程,传输的数据以文本流表示,是人类可读的,使用压缩技术可以与二进制格式的性能相差无几。最重要的是,解耦了编程的两端。
注意:这里提到的是 Unix-like 风格的服务器系统,而不是那些强调 RPC 把调用和数据绑定的古板的服务器系统。Unix 系统早期也原生提供一些 RPC,但是被认为是接口固化难以随时代发展变迁,后来又去掉了。但是,很明显,Java 领域出现了很多这样的服务器。
由此可以大致描述一下模板引擎的工作过程:
                   [Data]
[String Template] --------> Engine --> [String Text]
模板引擎不做 IO,只负责数据的产生,随后负责 IO 的调用把数据发送到目标(客户端):
[writer] -------------> [client]ECMAScript 2015 标准原生提供了模板字符串的功能,在一定程序可以扮演模板引擎的角色:
function renderTpl(items) {
  return `
  <h1>User List</h1>
  <ul>
    {
      items.map((item) => {
        return '<li>' + item.name + ':' + item.age + '</li>'
      })
    }
  </ul>
  `
}

var text = renderTpl([
  {
    name: 'XiaoMing',
    age: 31
  },
  {
    name: 'Tom',
    age: 21
  }
])
renderTpl 提供了一个数据接口 items,它是 Array<{name: string, value: number}> 结构。这段代码可以生成字符串:
  <h1>User List</h1>
  <ul>
  <li>XiaoMing:31</li>
  <li>Tom:21</li>
  </ul>
然后,你可以使用 Node.js 的 IO 接口把这段数据发送到客户端:
res.write(200, {'Content-Type': 'text/html'})
res.write(text)
res.end()
模板引擎的好处是,可以数据驱动,符合数据编程的理念。随着客户端技术的需要,比如 ajax 动态数据切换、客户端交互,数据需要在客户端更新。每次更新,需要(手动)编程主动调用模板引擎渲染新的数据。
MVVM 是模板引擎的进一步实现,绑定了更新和数据渲染。在这种机制下,你需要指定数据和绑定的 DOM,不再需要主动调用更新代码。
使用 React 的好处
React 是 Facebook 开源的 MVVM 数据绑定的渲染库,提供 HTML 的抽象表示
- 使用抽象模块化的 VDOM 操作 HTML DOM Tree
- 各个 VDOM 以抽象组件的方式存在,利于扩展和维护
- 数据绑定,不需要额外的渲染操作
Hello Rect
<!DOCTYPE html>
<html>
<head>
  <meta charset="utf-8">
  <title>Demo</title>
  <script src="react.js"></script>
  <script src="react-dom.js"></script>
</head>
<body>
  <div id="wrapper"></div>
  <script>
    class Message extends React.Component {
      render() {
        return <div>Hello {this.props.name}</div>
      }
    }

    ReactDOM.render(<Message name="John" />, document.getElementById('wrapper'))
  </script>
</body>
</html>例子
React Lifecycle
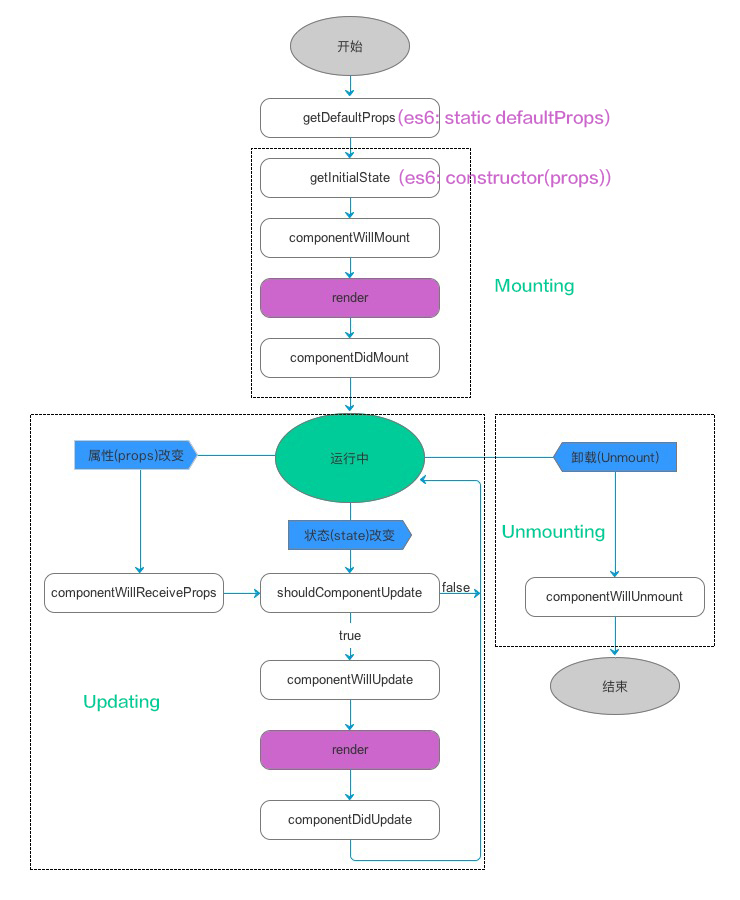
Mounting
constructor()componentWillMount()render()componentDidMount()
Updating
componentWillReceiveProps()shouldComponentUpdate()componentWillUpdate()render()componentDidUpdate()
Unmounting
componentWillUnmount()