# web
**Repository Path**: wsq_device/web
## Basic Information
- **Project Name**: web
- **Description**: web管理页面,前端展示用
- **Primary Language**: Unknown
- **License**: Not specified
- **Default Branch**: master
- **Homepage**: None
- **GVP Project**: No
## Statistics
- **Stars**: 0
- **Forks**: 0
- **Created**: 2025-09-09
- **Last Updated**: 2026-03-07
## Categories & Tags
**Categories**: Uncategorized
**Tags**: None
## README
## 项目介绍
[jcfk1.2](https://codeup.aliyun.com/632c06241017fdb58f60800d/ArchitectureGroup/xzjx-web.git) 是基于 Vue3 + Vite4+ TypeScript5 + Element-Plus + Pinia 等后台管理系统。
项目有以下特性:
- 基于 vue2 升级到 vue3 版本,无自定义封装,易上手,减少学习成本。
- 系统管理功能齐全,包括角色管理、用户管理、字典管理、组织结构等权限管理。
- 项目还提供了基础设施支持,质量管理,安全管理,能源管理,数据大屏等功能。
## 项目预览
- **在线预览**: [http://8.142.13.106:9081/#/login](http://8.142.13.106:9081/#/login)
- **接口文档**: [http://8.142.13.106:9081/system/swagger-ui.html#/](http://8.142.13.106:9081/system/swagger-ui.html#/)
## 环境准备
| 环境 | 名称版本 | 备注 |
| --------------------- | :----------------------------------------------------------------------------------------------- | ----------------------------------------------------------------------------------------- |
| **开发工具** | VSCode | [下载地址](https://code.visualstudio.com/Download) |
| **运行环境** | Node 16.19.0+ | [下载地址](http://nodejs.cn/download) |
| **VSCode 插件(必装)** | 1. `Vue Language Features (Volar) `
2. `TypeScript Vue Plugin (Volar) `
3. 禁用 Vetur |  |
## 项目启动
```bash
# 克隆代码
git clone https://codeup.aliyun.com/632c06241017fdb58f60800d/ArchitectureGroup/xzjx-web.git
# 切换目录
cd xzjx-web
# 安装 pnpm (Node 16.19.0+)
npm install pnpm -g
# 安装依赖
pnpm install
# 启动运行
pnpm run dev
```
## 项目部署
```bash
# 项目打包
pnpm run build:dev
pnpm run build:prod
阻止打包前检测代码规范删除 vue-tsc --noEmit 即可
# 上传文件至远程服务器
将打包生成在 `dist` 目录下的文件拷贝至 `/usr/share/nginx/html` 目录
# nginx.cofig 配置
server {
listen 80;
server_name localhost;
location / {
root /usr/share/nginx/html;
index index.html index.htm;
}
# 反向代理配置
location /prod-api/ {
proxy_pass http://aaaa.tech/; # aaaa.tech后端API地址
}
}
```
## 注意事项
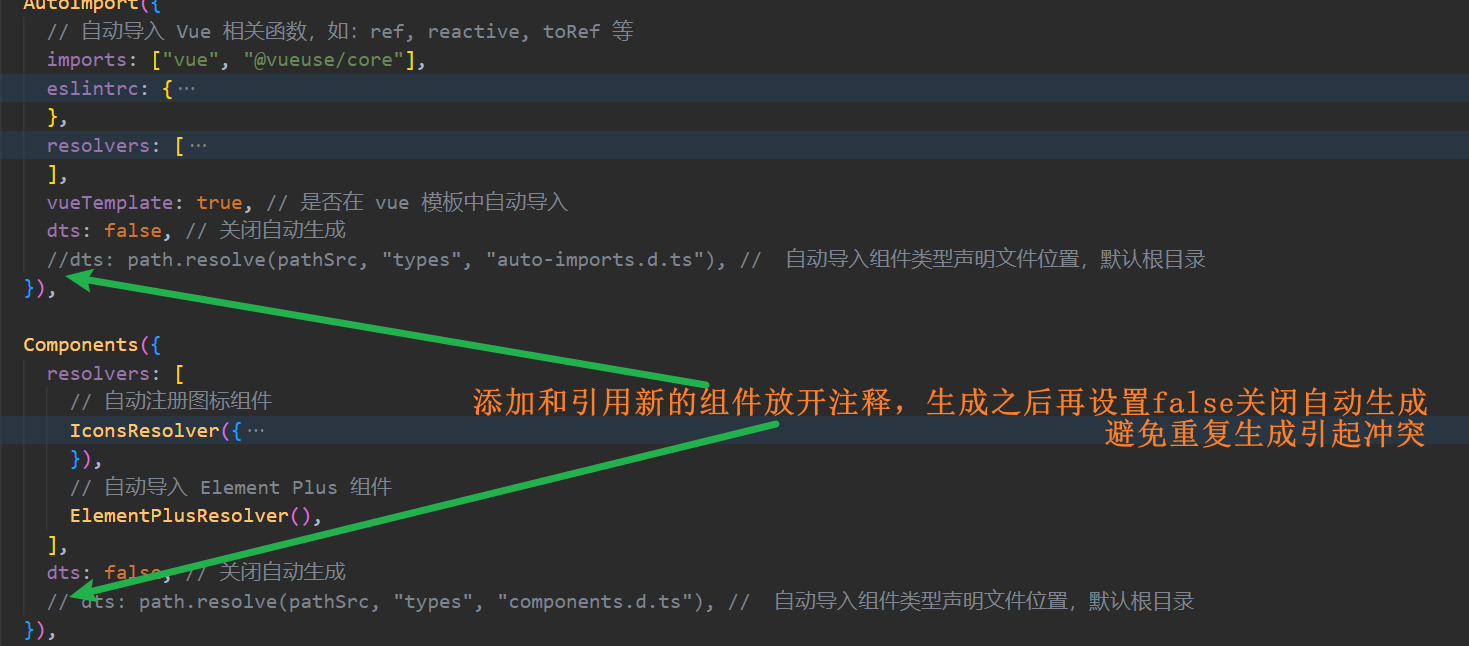
- **自动导入插件自动生成默认关闭**
模板项目的组件类型声明已自动生成。如果添加和使用新的组件,请按照图示方法开启自动生成。在自动生成完成后,记得将其设置为 `false`,避免重复执行引发冲突。
- **项目启动浏览器访问空白**
请升级浏览器尝试,低版本浏览器内核可能不支持某些新的 JavaScript 语法,比如可选链操作符 `?.`。
- **项目同步仓库更新升级**
项目同步仓库更新升级之后,建议 `pnpm install` 安装更新依赖之后启动 。
- **项目组件、函数和引用爆红**
重启 VSCode 尝试
## 提交规范
- 【feat-需求编号】详细添加功能描述...
- 【bugfix-禅道 bugID】详细修改描述...
- 【test】添加测试内容描述...
- 【style】样式修改描述...
## 技术栈
| 技术栈 | 链接 |
| ----------- | -------------------------------------------- |
| Vue3 | https://cn.vuejs.org/guide/introduction.html |
| ElementPlus | https://element-plus.org/zh-CN/ |
| Vite | https://cn.vitejs.dev/ |
| Pinia | https://pinia.web3doc.top/ |
| sass | https://www.sass.hk/ |
| UnoCSS | https://unocss.dev/interactive/ |
| VueUse | https://vueuse.netlify.app/guide/ |
## 目录
## 配置文件
- .env.development 测试环境变量文件
- .env.production 正式环境变量文件
- src/setting.ts 文字样式等公共变量存储
## 快速创建页面
**路由和页面的文件位置一致**
**组件命名规范(组件名称不重复)**
```js
// vite.config.ts
Components({
resolvers: [
// 自动导入 Element Plus 组件
ElementPlusResolver(),
// 自动注册图标组件
IconsResolver({ enabledCollections: ["ep"] }),
],
// 指定自定义组件位置(默认:src/components)
dirs: ["src/**/components"],
}),
```
**页面命名规范**
```js
// src/views/system/role/index.vue
defineOptions({
name: "SYSTEMROLE",
inheritAttrs: false,
});
```
## 按钮权限
**Directive 自定义指令使用**
```html
新增
删除
```
## 字典表值引用
**模板.vue 引用字典表数据方法**
```js
import { useDictionary } from "@/utils/useTable"; // 引入
useDictionary("SexType", 1); // 获取字典对应值
useDictionary("SexType"); // 获取字典对应list
```
**自定义.vue 引用字典表数据方法**
```js
import { useDictStoreHook } from "@/store/modules/dictionary"; // 引入
const dictionaryStore = useDictStoreHook(); // 定义
```
```vue
{{ dictionaryStore.filterDictName("SexType", scope.row.enabled) }}
```
## 组织机构选择器
**参数说明**
- width 宽度
- isMultiple 是否支持多选
- isCheckStrictly 用于树结构选择,true: 仅选择当前项
- maxCollapseTags 多选时, 最多显示 tag
- selectData 回显传参(:selectData="")
- data 自定义 api/name/defaultProps 值(不传则默认是组织机构选择,传 data 可进行扩展使用)
- getSelectIds 回传选中的值
- getSelectDatas 回传选中的对象
```html
```
```js
function getSelectIds(ids) {
console.log("所选组织机构ids", ids);
}
function getSelectDatas(datas: [] | {}) {
console.log("所选组织机构Datas", datas);
}
```
## 表单 单列改多列
**el-form 增加以下属性**
- :inline="true"
- class="demo-form-inline"
- label-width="150px"
## 条件搜索展开&折叠
**控制搜索条件的显示和隐藏**
- 定义折叠字段 collapsed
- 添加折叠按钮
- 将需要折叠的 el-form-item,用 span 包裹(详细代码如下)
```html
{{ collapsed ? "展开" : "收起" }}
```
```js
const collapsed = ref(true);
```
## 简约人员选择器调用说明
- maxCollapseTags 显示条数,剩余折叠
- width select 选择器自定义宽度
- getPerson 实时获取人员选择数据
- showSelectPerson 编辑时需要回显的数据
- isMultiple 默认为 true, false 为单选
```html
```
```js
const selectPersonData = ref([
{
id: "1727561827892842497",
firstName: "sdf",
},
]);
function getPerson(Ids: string[], Objects: any) {
console.log("人员选择变化啦", Ids, Objects);
}
```
## 人员选择器调用说明(详细、可自定义)
- html 和 js 中的代码直接粘贴到页面
- personSelectOptions 为 ids [1,23]
- personOptions 为 obj[] [{id:1,...},{id:23,...}]
```html
```
```js
/** 打开人员选择器方法 start **/
interface SelectOption {
id?: string;
}
const personSelectOptions: any = ref([]); // 选择器 list
const personOptions: any = ref([]); // 选择器 model ids
const selectRef = ref(ElSelect); // 选择器 ref
// 定义 人员选择器弹窗参数
const personSelect =
reactive <
DialogOption >
{
visible: false,
data: [],
};
// 移除 人员tag标签
function removeSelection(id: SelectOption) {
personOptions.value.forEach((row: SelectOption, index: number) => {
if (row.id === id) personOptions.value.splice(index, 1);
});
}
// 打开 人员选择器弹窗
function openSelectOriganization(event: boolean) {
if (event) {
selectRef.value.blur(); // 隐藏下拉框
personSelect.visible = true;
personSelect.data = personOptions.value;
}
}
// 接收 人员选择器回调参数
function getPersonSelect(options: any) {
personOptions.value = options;
const ids: any = [];
options?.map((item: SelectOption) => ids.push(item.id));
personSelectOptions.value = ids || [];
}
/** 打开人员选择器方法 end **/
```
## 扫码组件
**运行前提**:
1. 当前运行环境需要具备摄像头访问权限
2. 测试环境连接必须是 localhost,正式环境连接必须是 https
3. 手机或 ipad 调试时,需要在 index.html 中放开 vconsole 注释,可查看对应报错
4. /scanningCode 可跳过登录,直接访问扫码页面
5. demo 页面请访问 **views/demo/scanningCode**
##### 二维码组件参数说明
```html
```
```js
const showScaner = ref(false);
function errorCaptured(error) {}
function codeScanned(code: string) {}
```
##### 条形码组件参数说明
```html
```
```js
const showQuagga = ref(false);
function errorCaptured(error) {}
function codeScanned(code: string) {}
```
## 自定义列表页改造方法
详细参数的使用,请参考以下页面
- **参考示例 1 : demo/customTable/index.vue**
- **参考示例 2 : system/operateLog/index.vue**
```html
搜索
```
```js
/** 自定义设置方法 start **/
// 搜索参数 设置为响应式
const searchColumns: any = reactive([
{
type: "select", // 类型
label: "读取列表", // 搜索名称
isShow: true, // 是否展示
fieldName: "type", // 绑定字段名称
placeholder: "请选择类型", // 提示文字
initValue: null, // 默认显示文字
optionList: useDictionary("LogLevel"), // 下拉列表数据
},
]);
// 接收 columns 并设置为响应式
const tableColumns = reactive([
{ prop: "remarks", label: "备注", width: "auto", isShow: true },
{
prop: "enabled", // 绑定字段
label: "状态", // 表头名称
width: 120, // 长度设置
sortable: true, // 是否排序
isShow: true, // 是否展示
render: (
scope: any // 自定义内容 重点:如果页面需要自定义内容,srcipt lang必须设置为tsx
) => {useDictionary("Enabled", scope.row.enabled)},
},
]);
// 是否显示搜索框
const showSearch = ref(true);
/** 列表项自定义方法 end **/
```
## 地区选择器使用方法
地区选择器使用前,需要安装插件 `pnpm install element-china-area-data`
- **使用参考示例 : system/table/index.vue**
```html
```
```js
import { regionData, codeToText } from "element-china-area-data";
// 需要联动的数据
const areaOptions = ref(regionData);
// 需要回显的数据
const selectedOptions = ref(["12", "1201", "120101"]);
// 变更事件
function areaHandleChange(value: any) {
if (value) {
// 赋值操作
console.log("code", value);
console.log(
"中文",
codeToText[value[0]],
codeToText[value[1]],
codeToText[value[2]]
);
} else {
// 清空和重置操作
}
}
```
## 物料选择器使用方法
```html
```
```js
function setMaterialInfo(Ids: string[], objects: any) {
formData.materialId = objects[0].id;
formData.materialCode = objects[0].materialCode;
formData.materialName = objects[0].materialName;
}
function clearMaterialInfo() {
formData.materialId = "";
formData.materialCode = "";
formData.materialName = "";
}
```
## 设备选择器使用方法
```html
```
```js
// 回显/设置设备信息
const selectDeviceData = ref([
{
id: "1787687787147341826",
equipName: "材料试验机",
},
]);
// 获取设备选择信息
function getDevice(Ids: string[], Objects: any) {
console.log("获取设备选择信息", Ids, Objects);
}
```