# spring-cloud-study
**Repository Path**: xccit/spring-cloud-study
## Basic Information
- **Project Name**: spring-cloud-study
- **Description**: SpringCloud+SpringCloud Alibaba学习仓库
- **Primary Language**: Unknown
- **License**: MulanPSL-2.0
- **Default Branch**: master
- **Homepage**: None
- **GVP Project**: No
## Statistics
- **Stars**: 0
- **Forks**: 1
- **Created**: 2025-05-17
- **Last Updated**: 2025-10-20
## Categories & Tags
**Categories**: Uncategorized
**Tags**: None
## README
## SpringCloud+SpringCloud Alibaba学习笔记
### 搭建初始工程
#### 工程结构
> cloud-demo
>
> model
>
> services
>
> service-product
>
> service-order
#### 坐标引入
`cloud-demo`
```xml
4.0.0
org.springframework.boot
spring-boot-starter-parent
3.3.4
io.xccit
cloud-demo
1.0-SNAPSHOT
pom
services
model
17
17
UTF-8
2023.0.3
2023.0.3.2
org.springframework.cloud
spring-cloud-dependencies
${spring.cloud.version}
import
pom
com.alibaba.cloud
spring-cloud-alibaba-dependencies
${spring.cloud.alibaba.version}
import
pom
```
`services`
```xml
4.0.0
io.xccit
cloud-demo
1.0-SNAPSHOT
services
pom
service-order
service-product
17
17
UTF-8
org.springframework.boot
spring-boot-starter-web
org.springframework.boot
spring-boot-starter-test
test
org.projectlombok
lombok
io.xccit
model
1.0-SNAPSHOT
```
`model`
```xml
4.0.0
io.xccit
cloud-demo
1.0-SNAPSHOT
model
17
17
UTF-8
org.projectlombok
lombok
```
### 创建启动类
`以service-product为例`
```java
@SpringBootApplication
public class ProductApplication {
public static void main(String[] args) {
SpringApplication.run(ProductApplication.class, args);
}
}
```
### 创建配置文件
`以service-product为例`
```yaml
server:
port: 8082
```
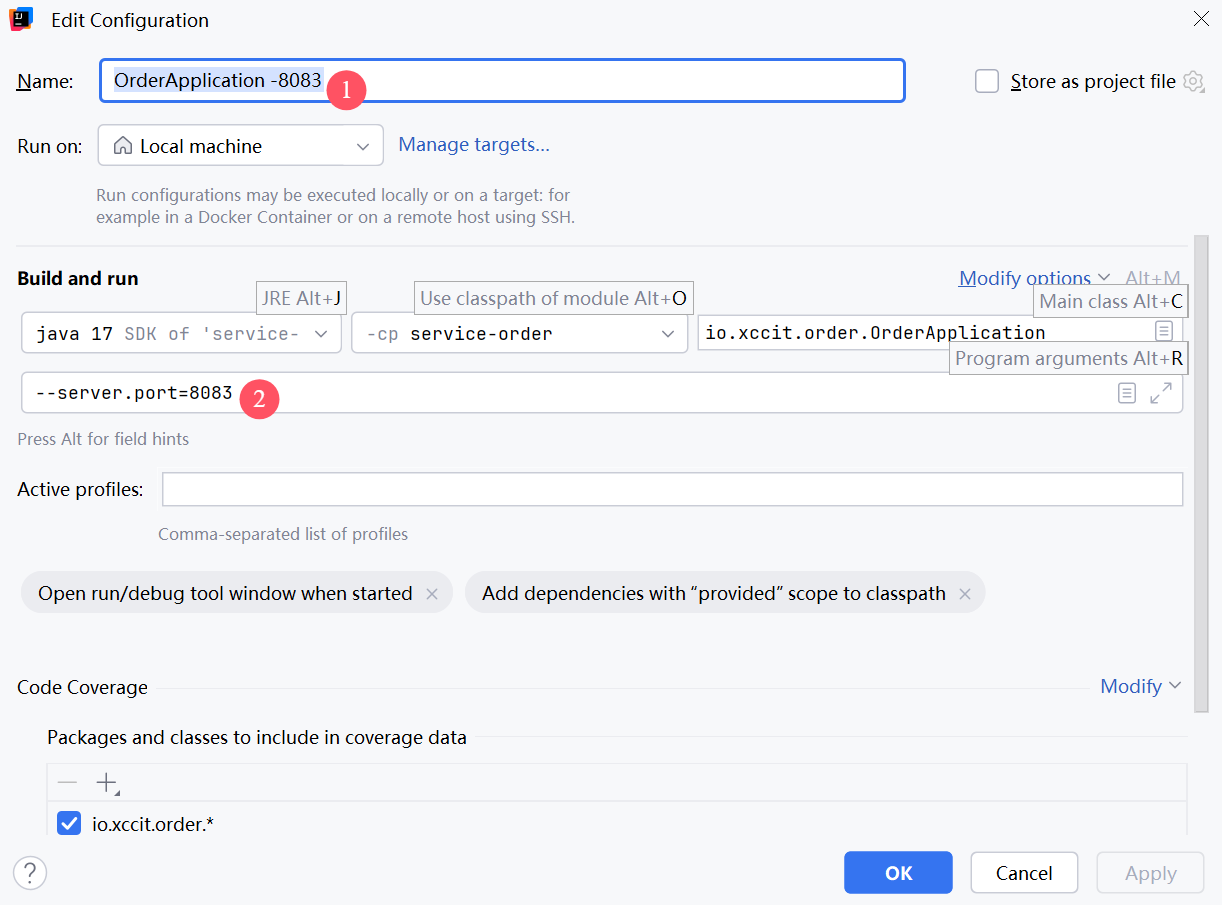
### 模拟微服务集群
`将启动类的配置多复制几份`
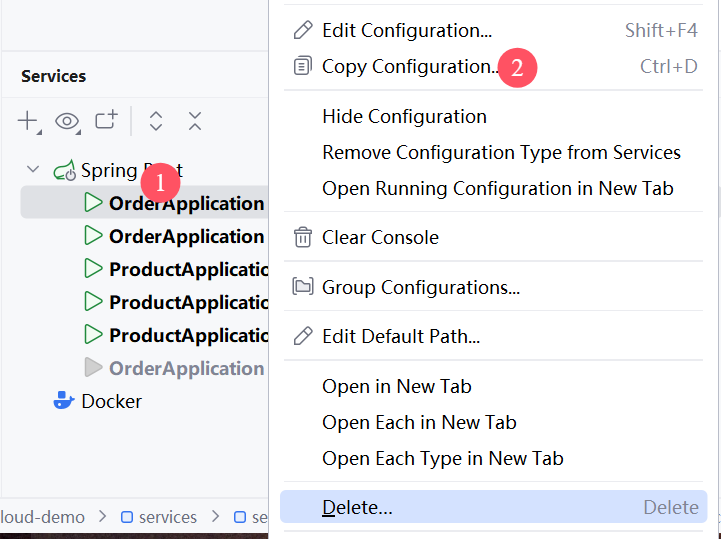
`修改复制后的启动类配置,为其配置启动参数`
## 服务发现
### 搭建Nacos环境
`官网:`[Nacos 概览 | Nacos 官网](https://nacos.io/docs/latest/overview/)
#### docker
```shell
docker pull nacos/nacos-server:v2.5.1
docker run --name nacos \
-e MODE=standalone \
-p 8848:8848 \
-p 9848:9848 \
-p 9849:9849 \
-p 7848:7848 \
-d nacos/nacos-server:v2.5.1
```
### 坐标
`services`
```xml
com.alibaba.cloud
spring-cloud-starter-alibaba-nacos-discovery
```
### 启动类注解
```java
@EnableDiscoveryClient
```
### 配置
```yaml
spring:
application:
name: service-product
cloud:
nacos:
discovery:
server-addr: 127.0.0.1:8848
```
### 测试
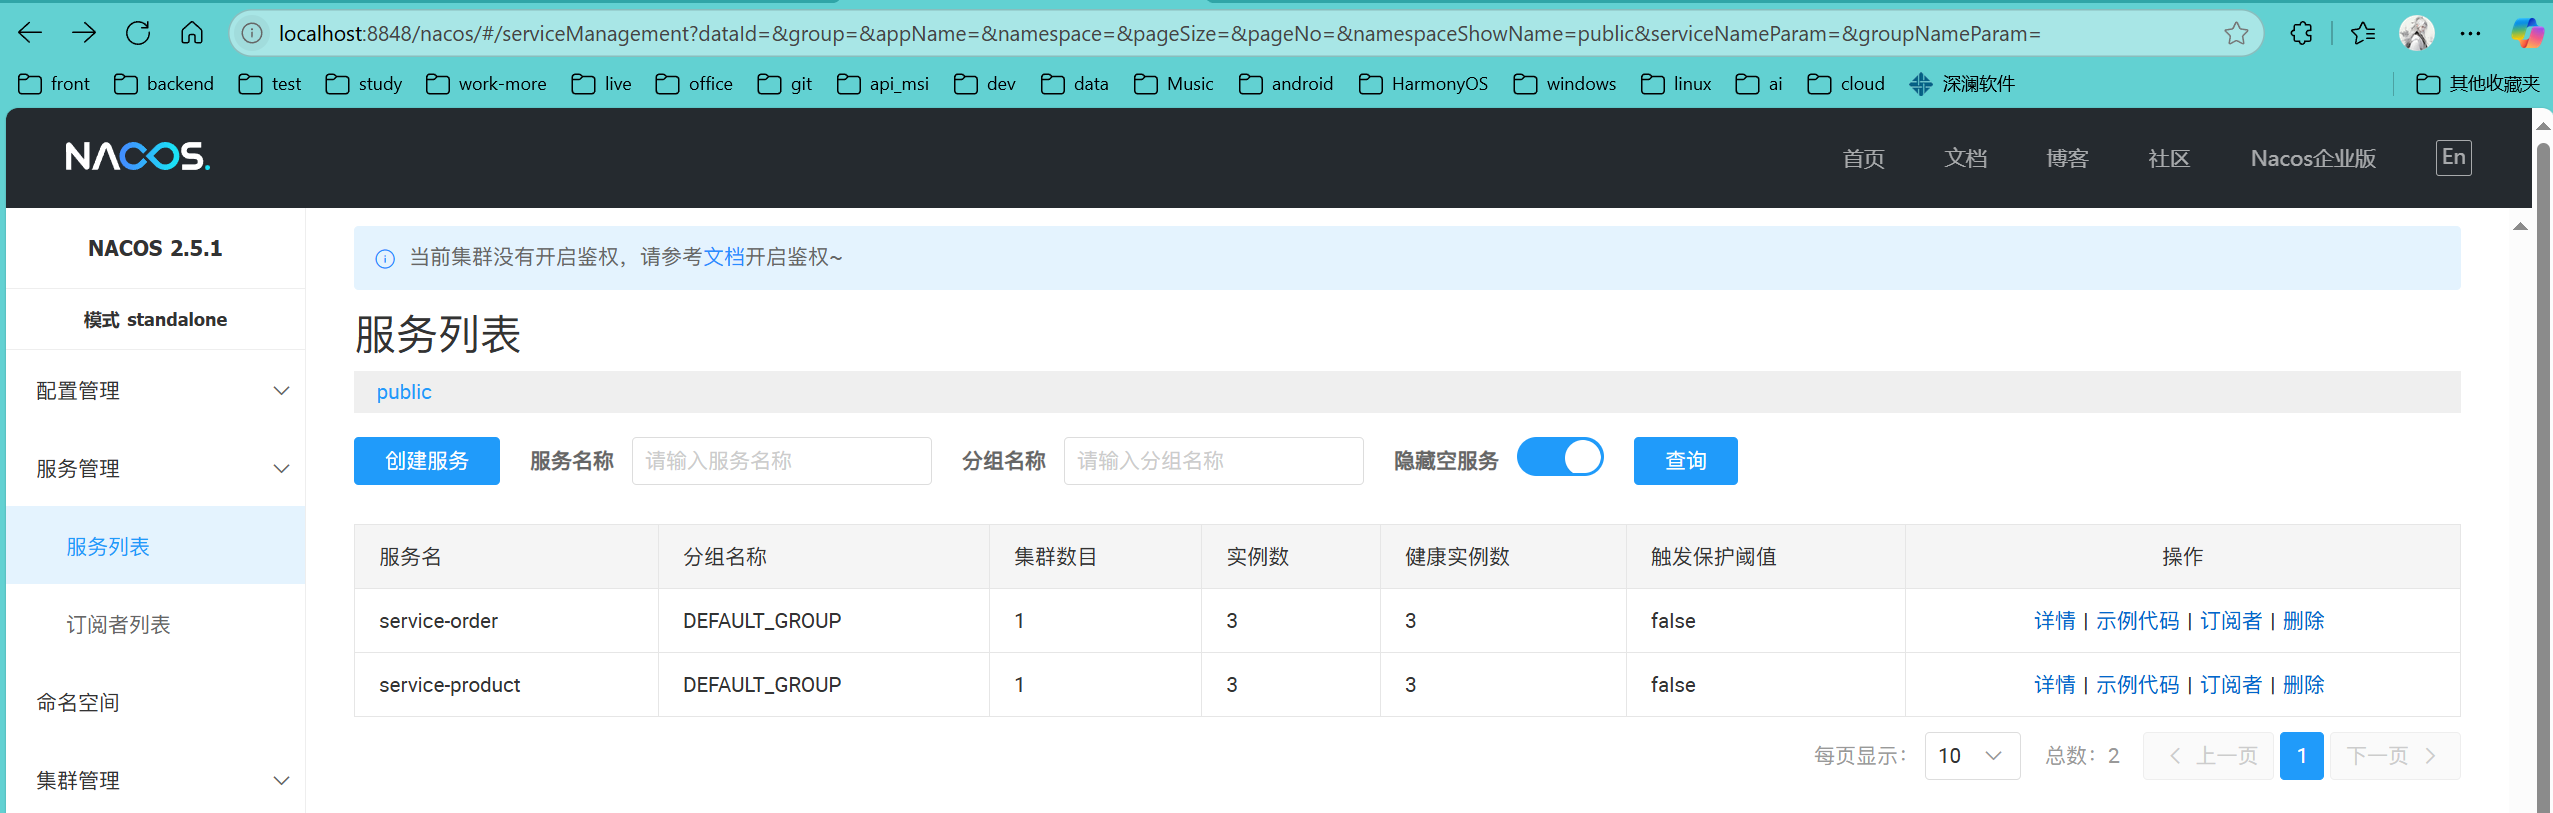
访问:`localhost:8848/nacos`,点击服务管理-->服务列表
## RestTemplate远程调用
### 环境搭建
创建商品接口,根据商品ID获取商品信息,然后订单接口,创建订单,需要远程调用获取商品接口来封装订单信息,配置RestTemplate来进行远程调用,`参考model模块,service-product以及service-order`
`配置RestTemplate`
```java
package io.xccit.order.config;
import org.springframework.cloud.client.loadbalancer.LoadBalanced;
import org.springframework.context.annotation.Bean;
import org.springframework.context.annotation.Configuration;
import org.springframework.web.client.RestTemplate;
/**
* @author CH_ywx
* @version 1.0
* @create 2025/5/17
* 远程调用配置
*/
@Configuration
public class RemoteConfig {
@Bean
public RestTemplate restTemplate(){
return new RestTemplate();
}
}
```
### 1.DiscoveryClient
```java
package io.xccit.order.service.impl;
import java.math.BigDecimal;
import java.util.Arrays;
import java.util.List;
import io.xccit.model.order.domain.Order;
import io.xccit.model.product.domain.Product;
import io.xccit.order.service.OrderService;
import lombok.extern.slf4j.Slf4j;
import org.springframework.beans.factory.annotation.Autowired;
import org.springframework.cloud.client.ServiceInstance;
import org.springframework.cloud.client.discovery.DiscoveryClient;
import org.springframework.cloud.client.loadbalancer.LoadBalancerClient;
import org.springframework.stereotype.Service;
import org.springframework.web.client.RestTemplate;
/**
* @author CH_ywx
* @version 1.0
* @create 2025/5/17
*
*/
@Slf4j
@Service
public class OrderServiceImpl implements OrderService {
@Autowired
private DiscoveryClient discoveryClient;
@Autowired
private RestTemplate restTemplate;
@Override
public Order createOrder(Long userId, Long productId) {
Product productByRemote = getProductByRemote(productId);
Order order = new Order();
order.setId(1L);
order.setTotalAmount(new BigDecimal(String.valueOf(productByRemote.getPrice().multiply(new BigDecimal(productByRemote.getNum())))));
order.setUserId(userId);
order.setAddress("甘肃省兰州市城关区雁北路400号");
order.setProductList(Arrays.asList(productByRemote));
return order;
}
/**
* 远程调用获取商品信息
* @param productId
* @return
*/
public Product getProductByRemote(Long productId) {
List instances = discoveryClient.getInstances("service-product");
ServiceInstance serviceInstance = instances.get(0);
String url = "http://" + serviceInstance.getHost() + ":" + serviceInstance.getPort() + "/product/" + productId;
log.info("调用商品服务获取商品信息,url:{}", url);
Product product = restTemplate.getForObject(url, Product.class);
return product;
}
}
```
### 2.LoadBalancerClient(负载均衡)
```xml
org.springframework.cloud
spring-cloud-starter-loadbalancer
```
```java
package io.xccit.order.service.impl;
import java.math.BigDecimal;
import java.util.Arrays;
import java.util.List;
import io.xccit.model.order.domain.Order;
import io.xccit.model.product.domain.Product;
import io.xccit.order.service.OrderService;
import lombok.extern.slf4j.Slf4j;
import org.springframework.beans.factory.annotation.Autowired;
import org.springframework.cloud.client.ServiceInstance;
import org.springframework.cloud.client.discovery.DiscoveryClient;
import org.springframework.cloud.client.loadbalancer.LoadBalancerClient;
import org.springframework.stereotype.Service;
import org.springframework.web.client.RestTemplate;
/**
* @author CH_ywx
* @version 1.0
* @create 2025/5/17
*
*/
@Slf4j
@Service
public class OrderServiceImpl implements OrderService {
@Autowired
private DiscoveryClient discoveryClient;
@Autowired
private LoadBalancerClient loadBalancerClient;
@Autowired
private RestTemplate restTemplate;
@Override
public Order createOrder(Long userId, Long productId) {
Product productByRemote = getProductByRemoteWithLoadBalancer(productId);
Order order = new Order();
order.setId(1L);
order.setTotalAmount(new BigDecimal(String.valueOf(productByRemote.getPrice().multiply(new BigDecimal(productByRemote.getNum())))));
order.setUserId(userId);
order.setAddress("甘肃省兰州市城关区雁北路400号");
order.setProductList(Arrays.asList(productByRemote));
return order;
}
/**
* 远程调用获取商品信息
* @param productId
* @return
*/
public Product getProductByRemote(Long productId) {
List instances = discoveryClient.getInstances("service-product");
ServiceInstance serviceInstance = instances.get(0);
String url = "http://" + serviceInstance.getHost() + ":" + serviceInstance.getPort() + "/product/" + productId;
log.info("调用商品服务获取商品信息,url:{}", url);
Product product = restTemplate.getForObject(url, Product.class);
return product;
}
/**
* 负载均衡远程调用获取商品信息
* @param productId
* @return
*/
public Product getProductByRemoteWithLoadBalancer(Long productId) {
//轮询负载均衡算法(每个实例都换着来一次)
ServiceInstance serviceInstance = loadBalancerClient.choose("service-product");
String url = "http://" + serviceInstance.getHost() + ":" + serviceInstance.getPort() + "/product/" + productId;
log.info("调用商品服务获取商品信息,url:{}", url);
Product product = restTemplate.getForObject(url, Product.class);
return product;
}
}
```
### 3.基于注解式的负载均衡
```java
package io.xccit.order.config;
import org.springframework.cloud.client.loadbalancer.LoadBalanced;
import org.springframework.context.annotation.Bean;
import org.springframework.context.annotation.Configuration;
import org.springframework.web.client.RestTemplate;
/**
* @author CH_ywx
* @version 1.0
* @create 2025/5/17
* 远程调用配置
*/
@Configuration
public class RemoteConfig {
@LoadBalanced //注解式负载均衡,不加则没有负载均衡功能
@Bean
public RestTemplate restTemplate(){
return new RestTemplate();
}
}
```
```java
package io.xccit.order.service.impl;
import java.math.BigDecimal;
import java.util.Arrays;
import java.util.List;
import io.xccit.model.order.domain.Order;
import io.xccit.model.product.domain.Product;
import io.xccit.order.service.OrderService;
import lombok.extern.slf4j.Slf4j;
import org.springframework.beans.factory.annotation.Autowired;
import org.springframework.cloud.client.ServiceInstance;
import org.springframework.cloud.client.discovery.DiscoveryClient;
import org.springframework.cloud.client.loadbalancer.LoadBalancerClient;
import org.springframework.stereotype.Service;
import org.springframework.web.client.RestTemplate;
/**
* @author CH_ywx
* @version 1.0
* @create 2025/5/17
*
*/
@Slf4j
@Service
public class OrderServiceImpl implements OrderService {
@Autowired
private DiscoveryClient discoveryClient;
@Autowired
private LoadBalancerClient loadBalancerClient;
@Autowired
private RestTemplate restTemplate;
@Override
public Order createOrder(Long userId, Long productId) {
Product productByRemote = getProductByRemoteWithLoadBalancerAnnotation(productId);
Order order = new Order();
order.setId(1L);
order.setTotalAmount(new BigDecimal(String.valueOf(productByRemote.getPrice().multiply(new BigDecimal(productByRemote.getNum())))));
order.setUserId(userId);
order.setAddress("甘肃省兰州市城关区雁北路400号");
order.setProductList(Arrays.asList(productByRemote));
return order;
}
/**
* 远程调用获取商品信息
* @param productId
* @return
*/
public Product getProductByRemote(Long productId) {
List instances = discoveryClient.getInstances("service-product");
ServiceInstance serviceInstance = instances.get(0);
String url = "http://" + serviceInstance.getHost() + ":" + serviceInstance.getPort() + "/product/" + productId;
log.info("调用商品服务获取商品信息,url:{}", url);
Product product = restTemplate.getForObject(url, Product.class);
return product;
}
/**
* 负载均衡远程调用获取商品信息
* @param productId
* @return
*/
public Product getProductByRemoteWithLoadBalancer(Long productId) {
//轮询负载均衡算法(每个实例都换着来一次)
ServiceInstance serviceInstance = loadBalancerClient.choose("service-product");
String url = "http://" + serviceInstance.getHost() + ":" + serviceInstance.getPort() + "/product/" + productId;
log.info("调用商品服务获取商品信息,url:{}", url);
Product product = restTemplate.getForObject(url, Product.class);
return product;
}
/**
* 注解式负载均衡远程调用获取商品信息
* @param productId
* @return
* @see io.xccit.order.config.RemoteConfig#restTemplate()
*/
public Product getProductByRemoteWithLoadBalancerAnnotation(Long productId) {
String url = "http://service-product" + "/product/" + productId;
log.info("调用商品服务获取商品信息,url:{}", url);
Product product = restTemplate.getForObject(url, Product.class);
return product;
}
}
```
### 测试时注意事项
`基于注解式的负载均衡`需要在product模块的接口方法中写一个打印,方便控制台日志查看是从哪个端口的实例中获取到的商品信息,`其他的负载均衡`测试只需要在远程调用的方法中打印该URL即可
## 注册中心
### 坐标
```xml
com.alibaba.cloud
spring-cloud-starter-alibaba-nacos-config
```
### 导入配置
```yaml
spring:
config:
import: nacos:service-order.properties
```
### Nacos配置
`官网文档:`[Nacos 融合 Spring Cloud,成为注册配置中心 | Nacos 官网](https://nacos.io/docs/v2/ecology/use-nacos-with-spring-cloud/)
### 读取配置
```java
@Slf4j
@RestController
@RequestMapping("/order")
public class OrderController {
@Autowired
private OrderService orderService;
@Value("${order.time-out}")
private String orderTimeOut;
@GetMapping("/create")
public Order createOrder(Long userId, Long productId) {
log.info("Nacos配置订单超时:{}", orderTimeOut);
return orderService.createOrder(userId, productId);
}
}
```

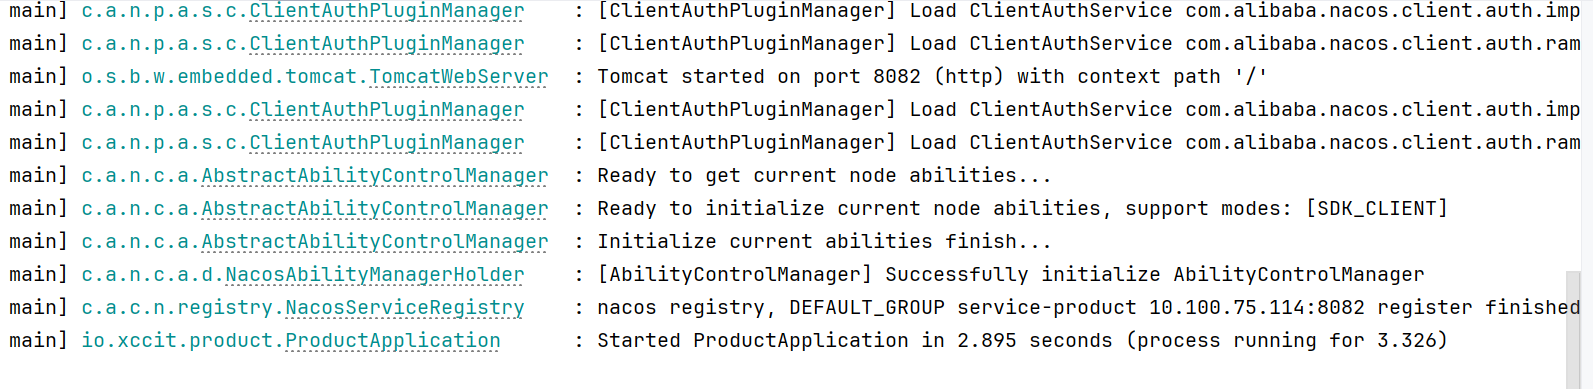
`请求接口查看到的日志信息`
### 激活配置属性的自动刷新
`@RefreshScope`注解
```java
@Slf4j
@RefreshScope
@RestController
@RequestMapping("/order")
public class OrderController {
@Autowired
private OrderService orderService;
@Value("${order.time-out}")
private String orderTimeOut;
@GetMapping("/create")
public Order createOrder(Long userId, Long productId) {
log.info("Nacos配置订单超时:{}", orderTimeOut);
return orderService.createOrder(userId, productId);
}
}
```
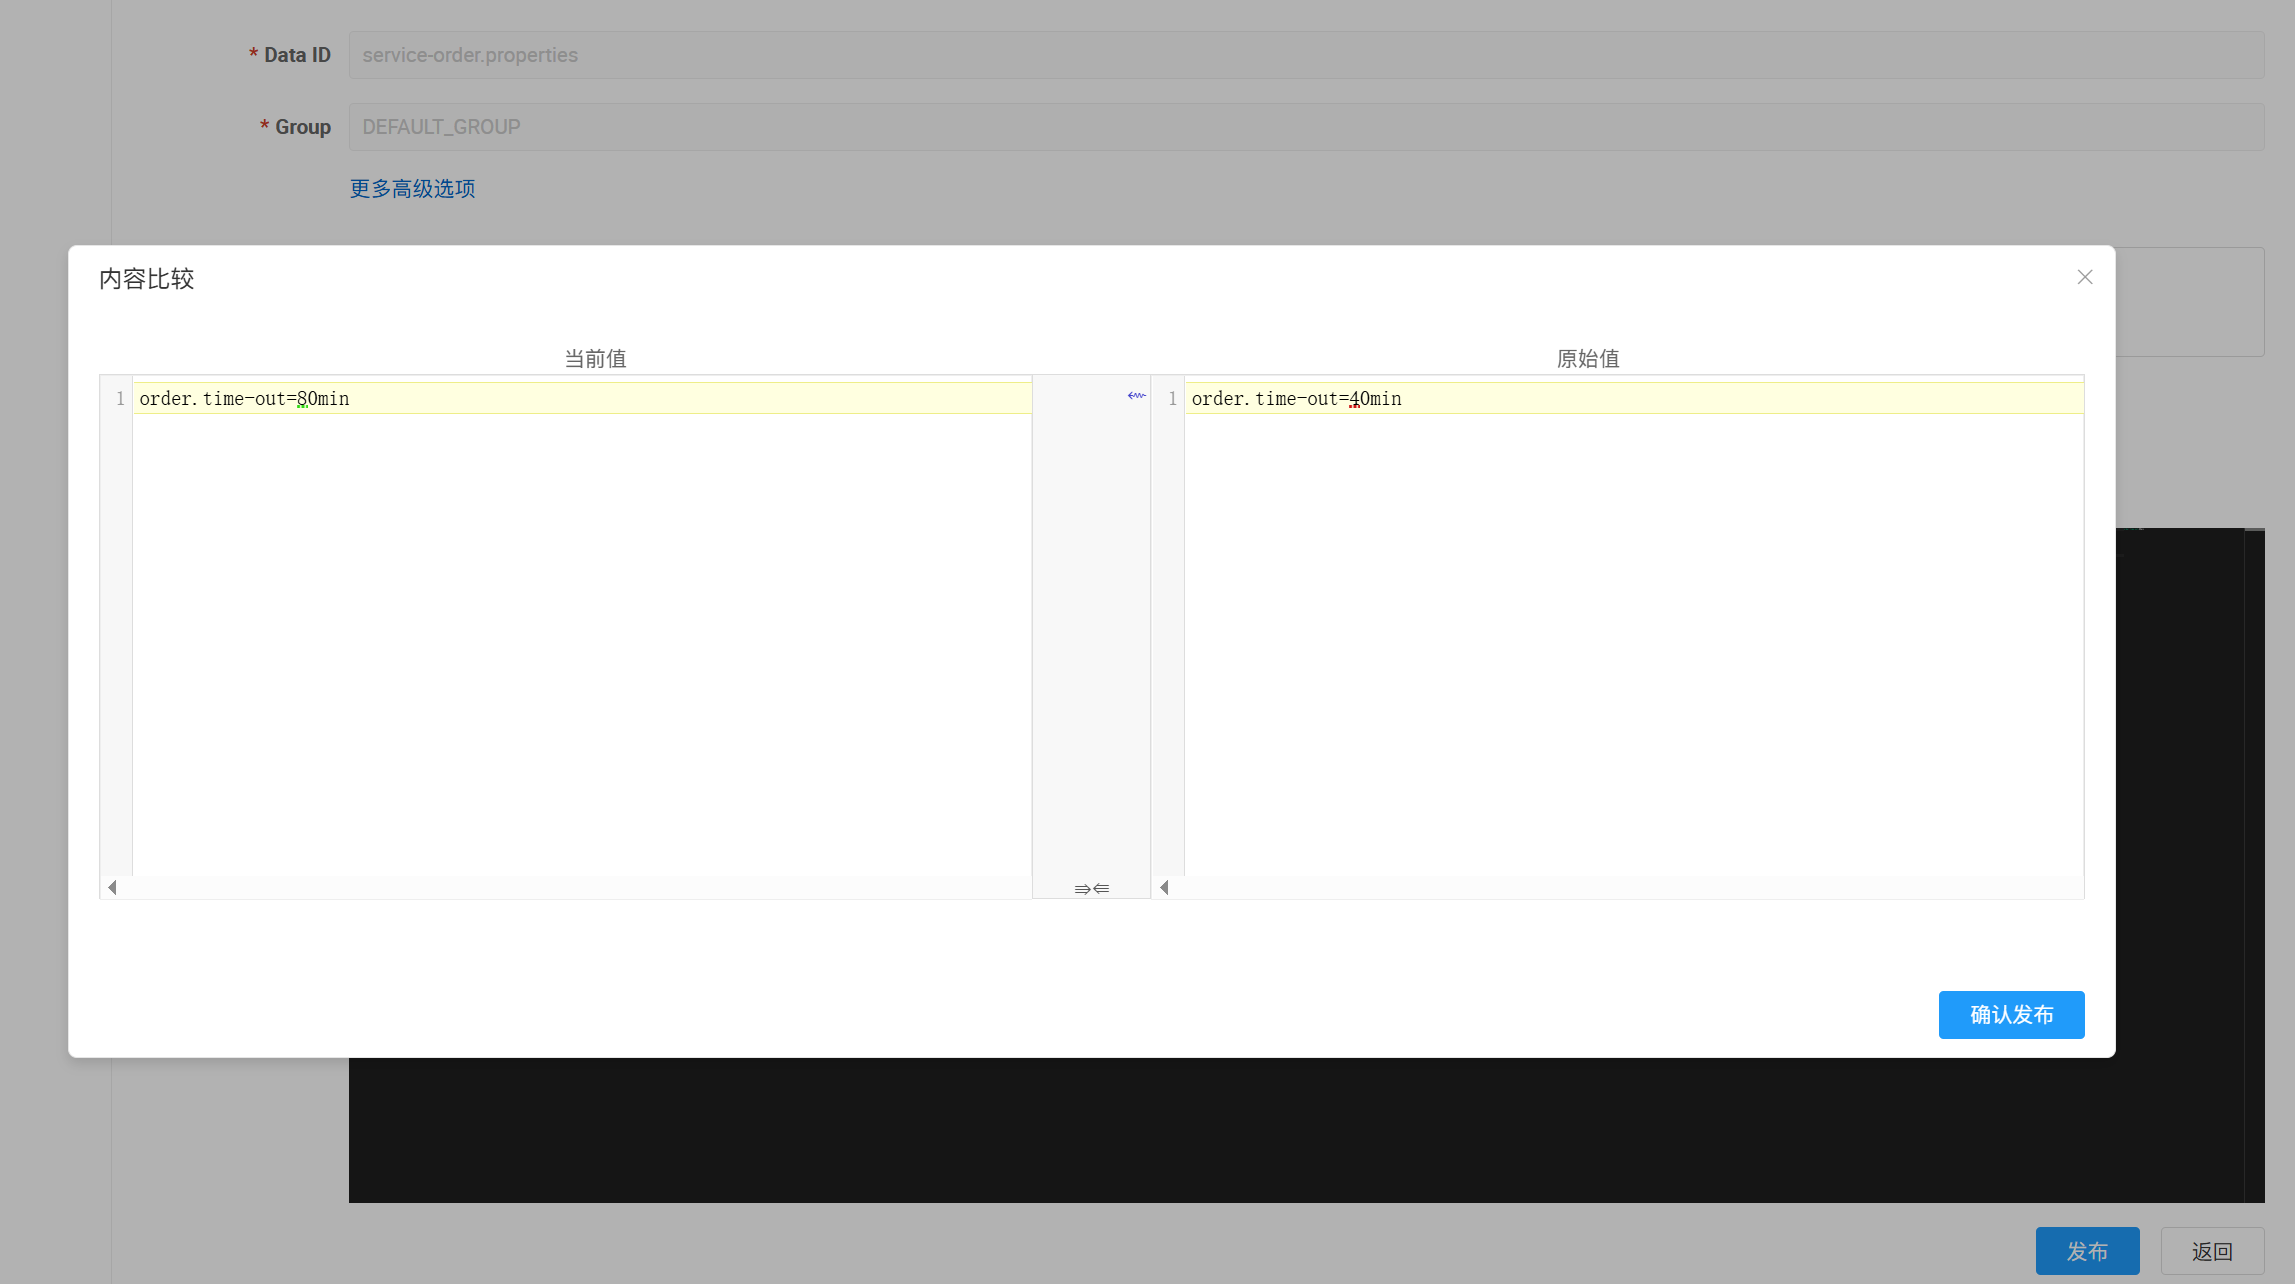
这样,当属性在Nacos中修改掉时,项目可以自动刷新该配置的值,重启项目,修改Nacos配置,重新测试


### 暂时不需要配置中心但是有配置中心依赖的模块
`启动报错`
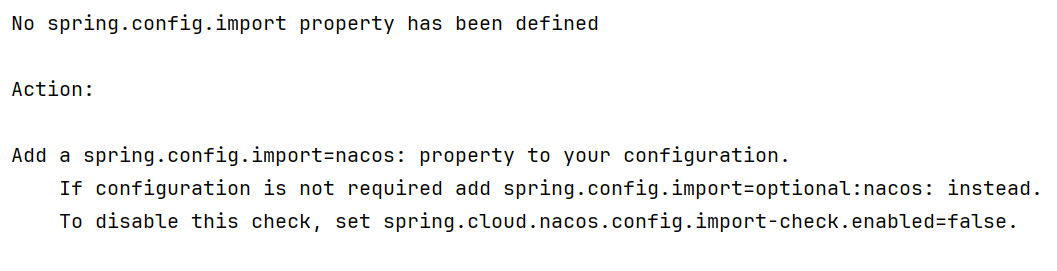
`解决方式`
```yaml
spring:
cloud:
config:
import-check:
enabled: false
```
### 配置中心动态无感刷新
`@RefreshScope`+`@Value`的方式太过繁琐,使用SpringBoot提供的`ConfigurationProperties`会更方便
#### 新建一个配置类
```java
/**
* @author CH_ywx
* @version 1.0
* @create 2025/5/19
* Order模块使用Nacos配置中心的属性
*/
@Component
@Data
@ConfigurationProperties(prefix = "order")
public class OrderNacosProperties {
private String timeOut;
}
```
`注意:配置中心的-或者_写法在JavaBean中使用驼峰命名规则即可`
#### Controller改造
```java
@Slf4j
@RestController
@RequestMapping("/order")
public class OrderController {
@Autowired
private OrderService orderService;
@Autowired
private OrderNacosProperties orderNacosProperties;
@GetMapping("/create")
public Order createOrder(Long userId, Long productId) {
log.info("Nacos配置订单超时:{}", orderNacosProperties.getTimeOut());
return orderService.createOrder(userId, productId);
}
}
```
#### 重启测试

### 监听配置
`ApplicationRunner`配合`NacosConfigManager组件`
```java
@SpringBootApplication
@EnableDiscoveryClient
public class OrderApplication {
public static void main(String[] args) {
SpringApplication.run(OrderApplication.class, args);
}
/**
* 启动成功后执行的一次性任务
* @param nacosConfigManager 自动从容器中拿出的配置管理器(原本没有参数,加上之后会自动从容器中拿)
* @return
*/
@Bean
ApplicationRunner applicationRunner(NacosConfigManager nacosConfigManager){
return args -> {
System.out.println("Order服务启动成功");
ConfigService configService = nacosConfigManager.getConfigService();
//参数值参照Nacos配置文件的属性来填写 配置文件ID 配置文件所属组
configService.addListener("service-order.properties", "DEFAULT_GROUP", new Listener() {
@Override
public Executor getExecutor() {
//返回一个固定4个线程的线程池(随意,不一定是4)
return Executors.newFixedThreadPool(4);
}
@Override
public void receiveConfigInfo(String s) {
System.out.println("监听到配置文件更新: " + s);
}
});
};
}
}
```
`重启测试,项目重启后修改Nacos配置`
### 配置优先级
`先导入优先`--->`外部优先`
先导入优先:导入多个配置后,按照声明的优先级生效,相同配置的值以先导入的为主
外部优先:外部配置比本地配置文件的优先级更高
`外部配置+本地配置`合并后,生成一个配置列表,程序启动后,配置列表加载到项目的环境变量中去,以后要获取的配置按照项目的环境变量中的值为准
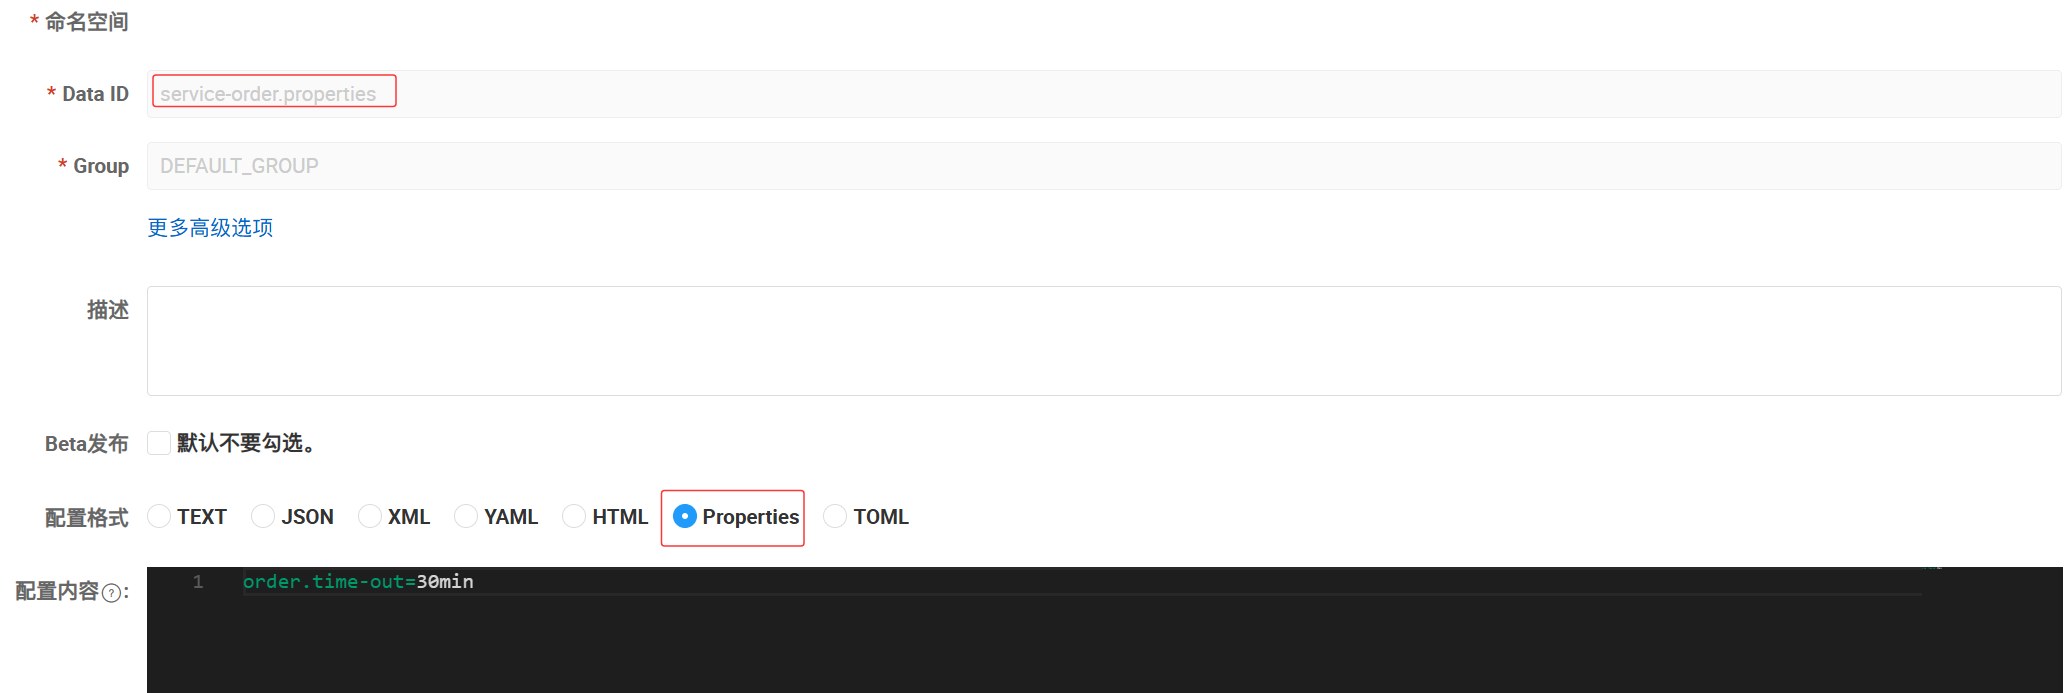
### 数据隔离
微服务开发中,模块多,配置也多,如果配置都在一起,容易混淆且不好管理,这个时候就需要配置`数据隔离`
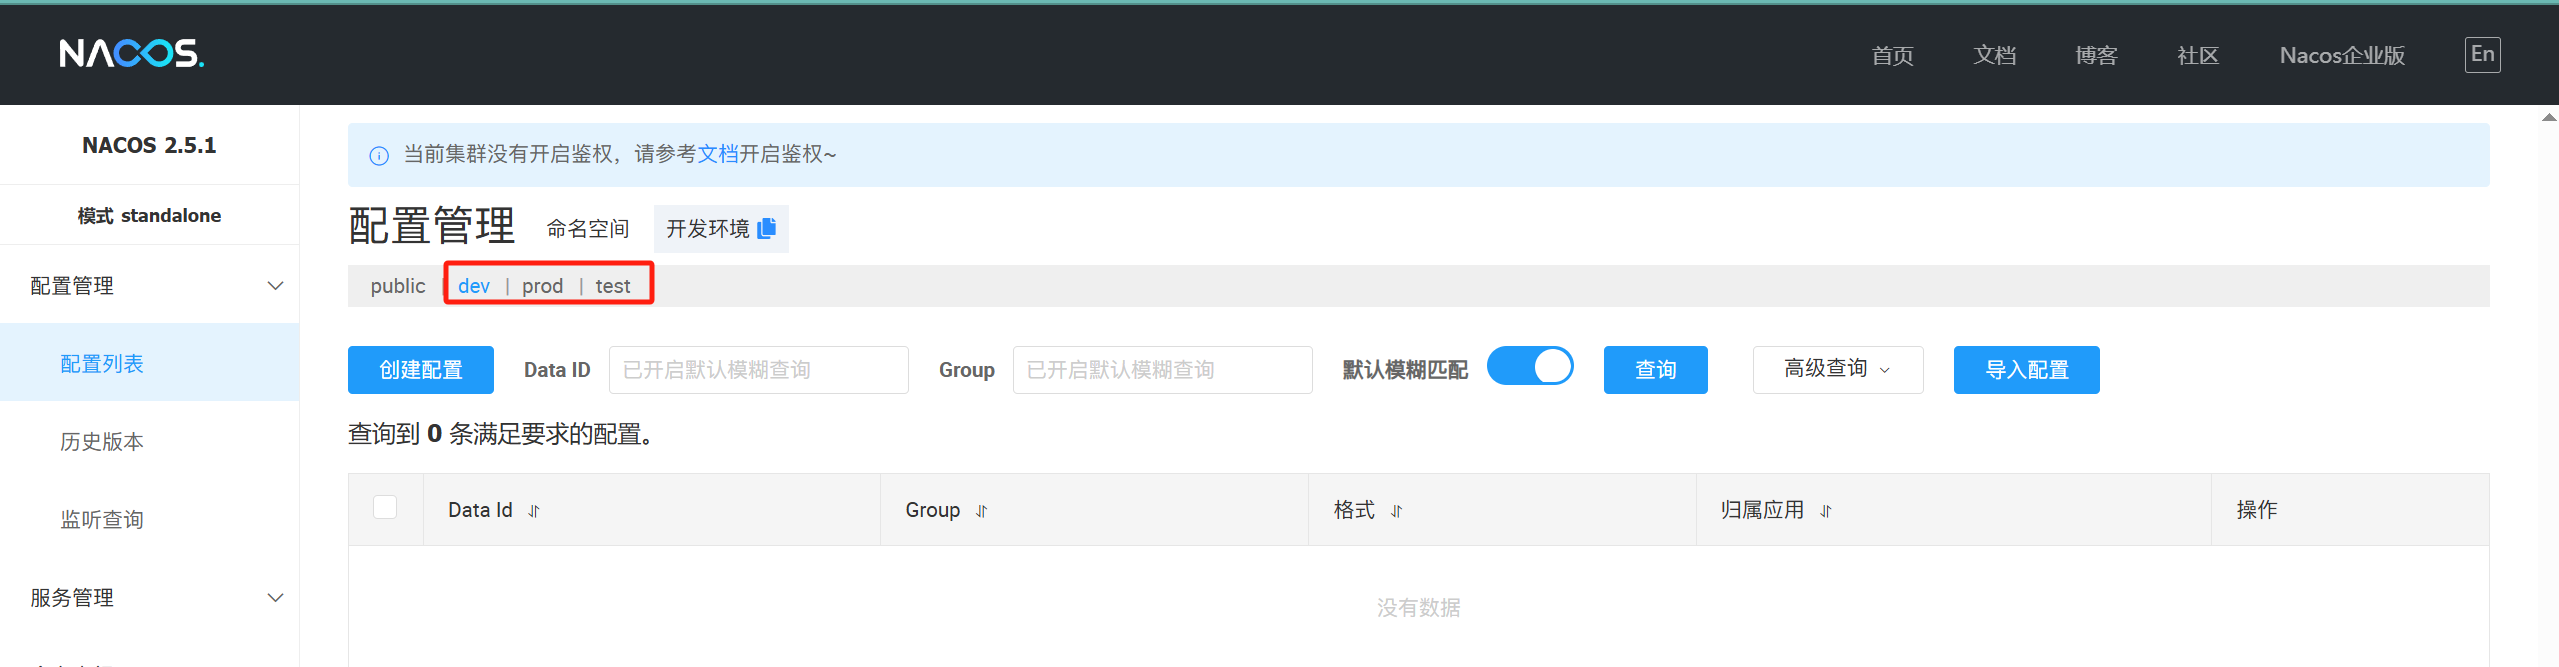
#### 1.Naocs命名空间
`默认只有一个public`
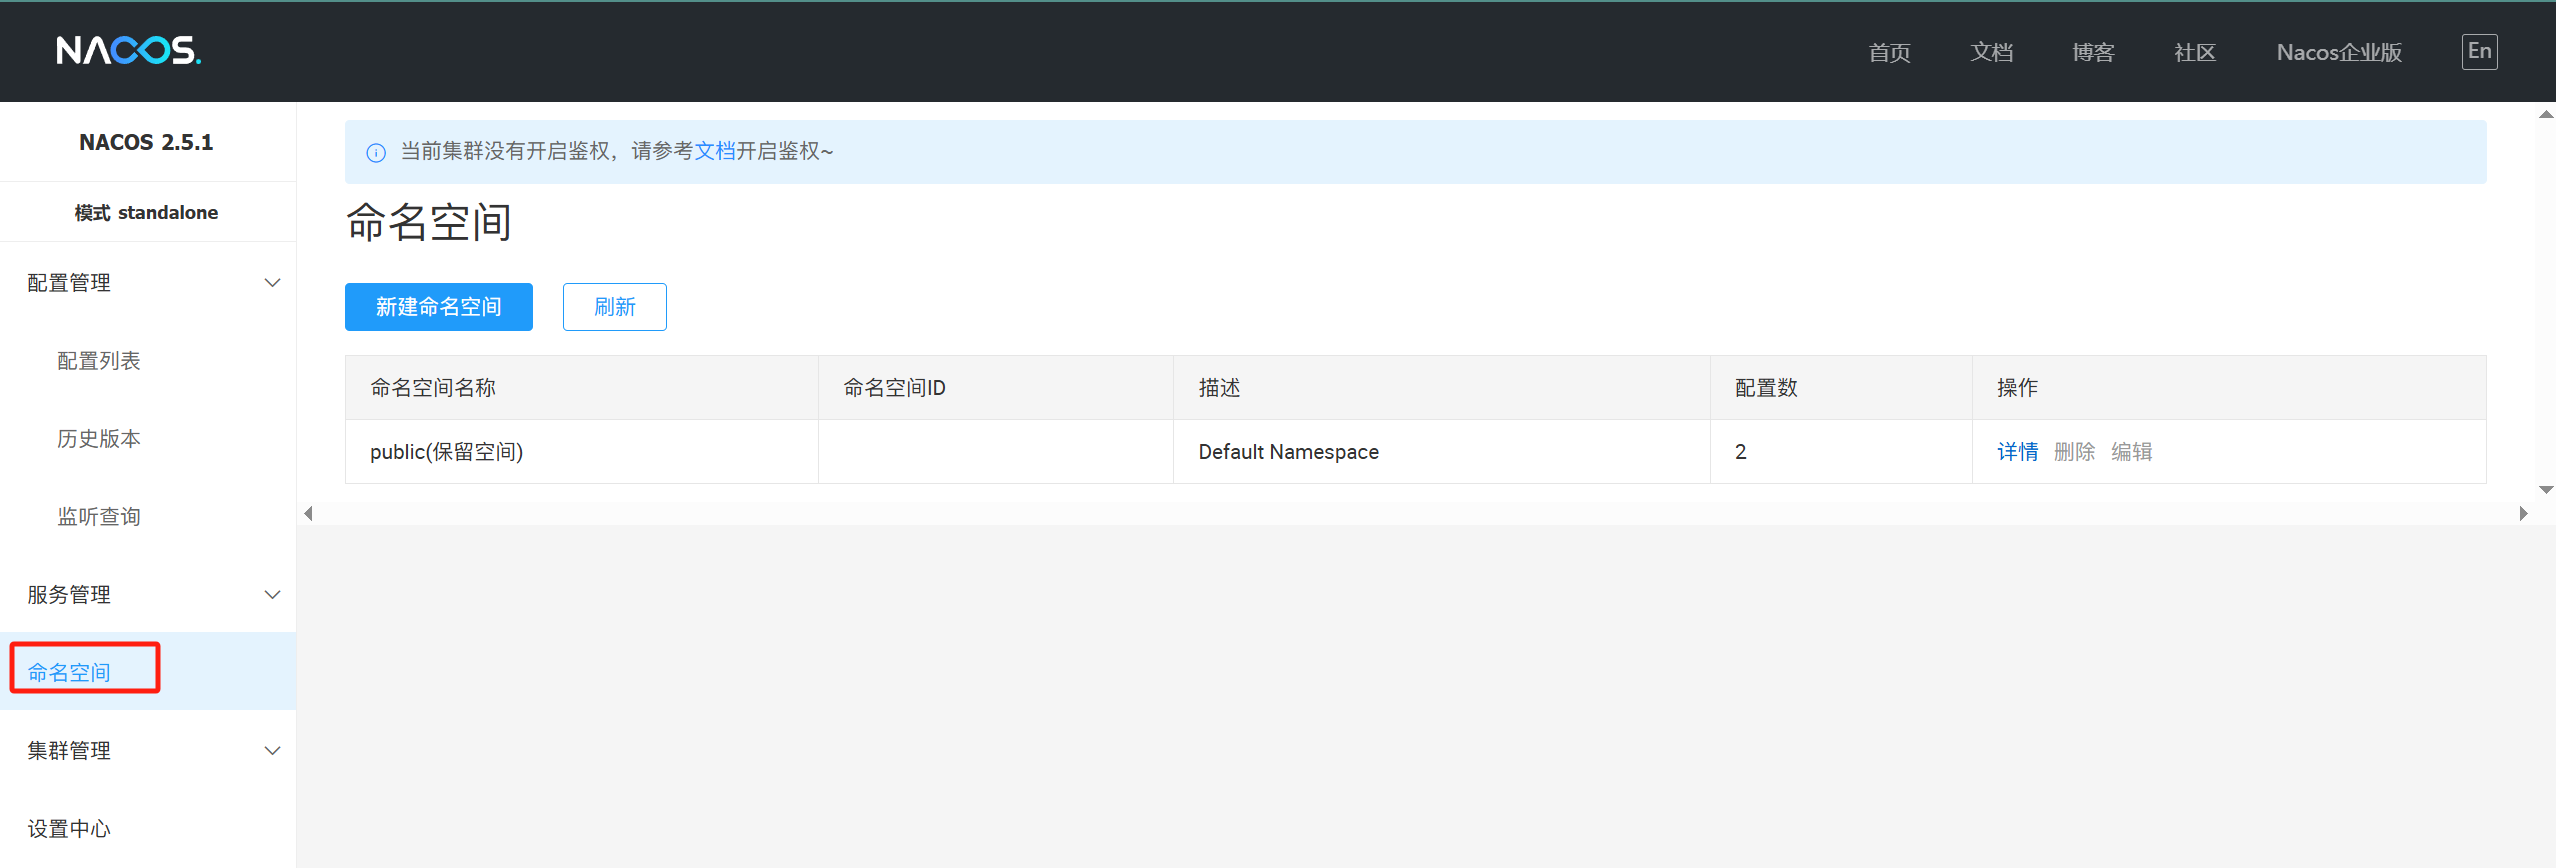
`创建多个`

#### 2.为服务创建多个配置
`分别点击不同的命名空间,创建配置文件`
`通用配置common.yaml`
```yaml
order:
time-out: 30min
```
`数据源datasource.yaml`
```yaml
order:
jdbc-driver-class: com.mysql.jdbc.cj.Driver
url: jdbc:mysql://localhost:3306/service-order?useUnicode=true&characterEncoding=UTF-8&serverTimezone=Asia/Shanghai
username: root
password: root
```
`其他命名空间中,可以使用克隆来快速复制配置数据`
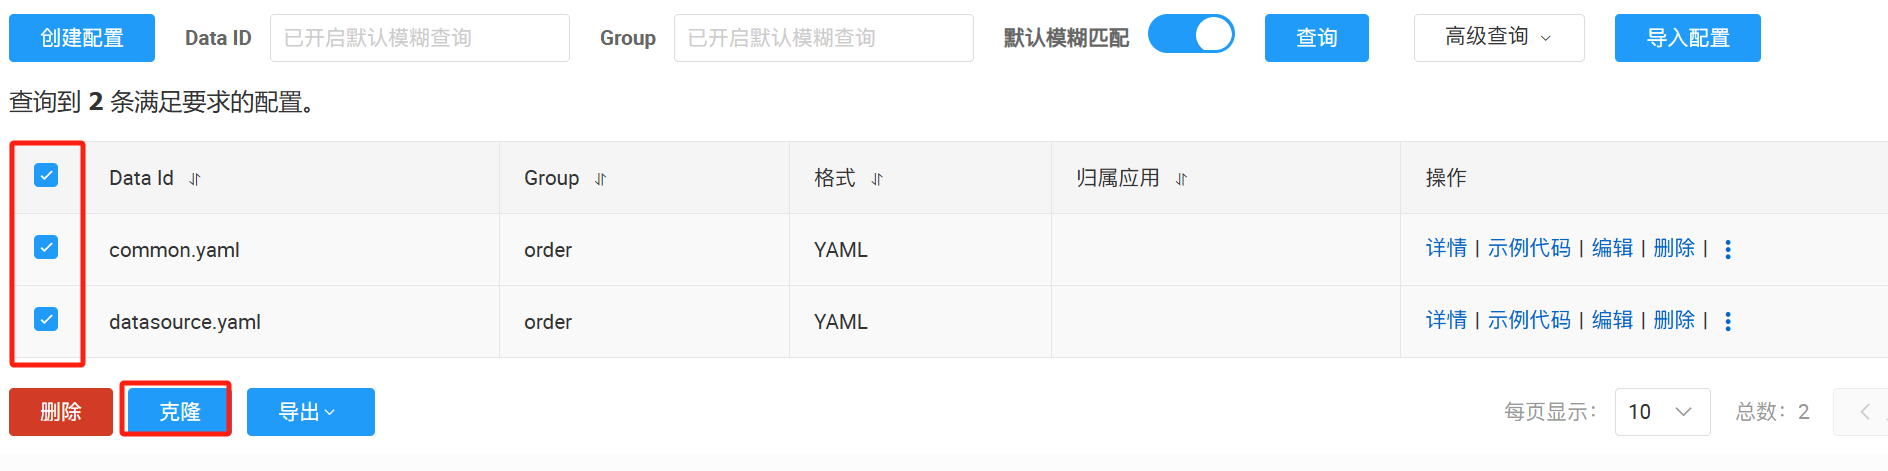
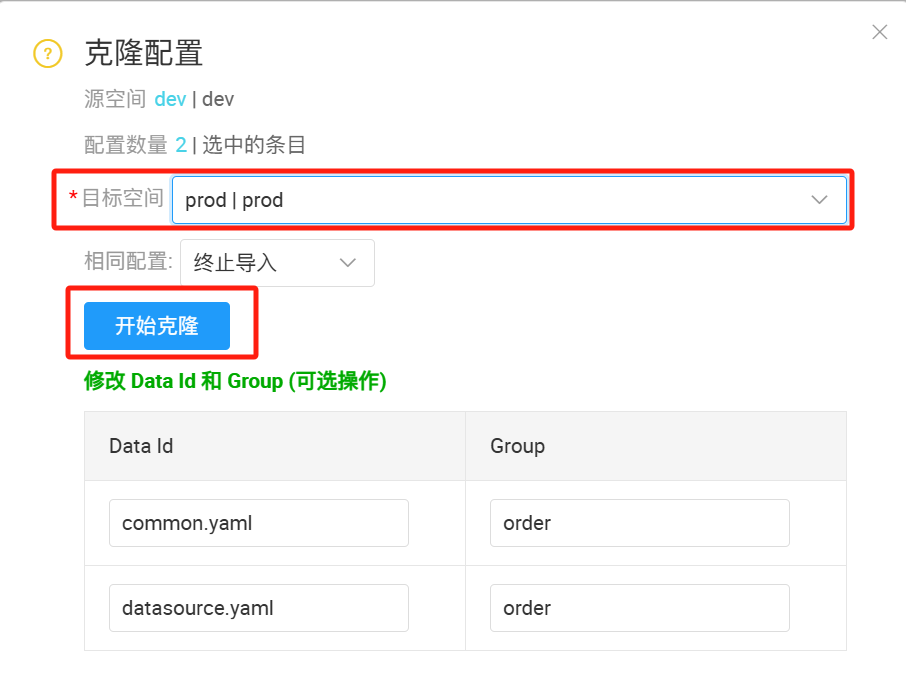
> `Tips:`克隆后记得修改配置,以免测试时无法区分
#### 3.按需加载
`order模块的application.yml`
```yaml
server:
port: 8081
spring:
application:
name: service-order
cloud:
nacos:
discovery:
server-addr: 127.0.0.1:8848
config:
# 对应的命名空间
namespace: dev
config:
import:
# ?group=order --> nacos配置的分组
- nacos:common.yaml?group=order
- nacos:datasource.yaml?group=order
```
`OrderNacosProperties.java`
```java
@Component
@Data
@ConfigurationProperties(prefix = "order")
public class OrderNacosProperties {
private String timeOut;
private String jdbcDriverClass;
private String url;
private String username;
private String password;
}
```
`OrderController.java`
```java
@RestController
@RequestMapping("/order")
public class OrderController {
@Autowired
private OrderService orderService;
@Autowired
private OrderNacosProperties orderNacosProperties;
/**
* 创建订单
* @param userId
* @param productId
* @return
*/
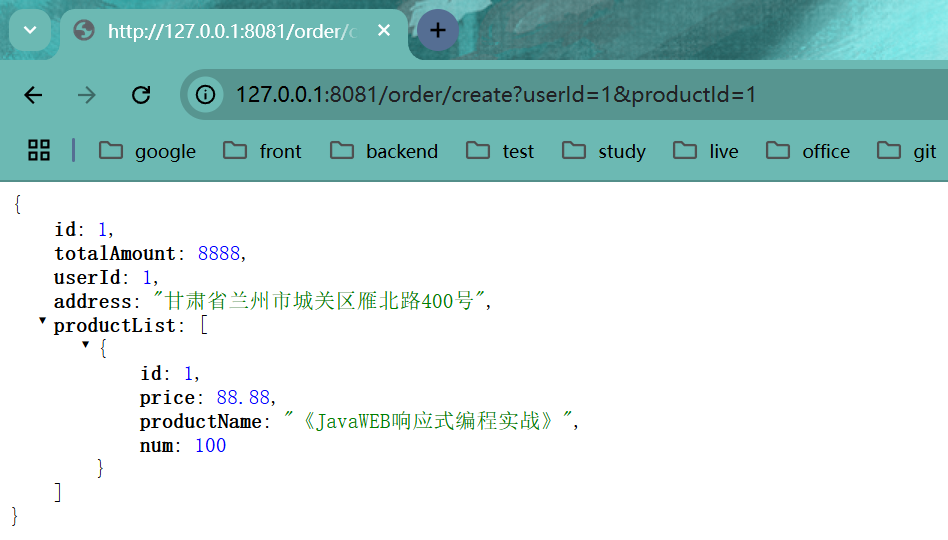
@GetMapping("/create")
public Order createOrder(Long userId, Long productId) {
return orderService.createOrder(userId, productId);
}
/**
* 获取nacos配置
* @return
*/
@GetMapping("/nacos-config")
public String getNacosConfig() {
return orderNacosProperties.toString();
}
}
```
`重启测试`

`日志中也有信息,后面success表示前面的配置加载成功`

#### 4.不同环境动态加载
使用`SpringBoot的多环境激活配置`
`application.yml`
```yml
server:
port: 8081
spring:
application:
name: service-order
profiles:
# 激活的环境配置
active: dev
cloud:
nacos:
discovery:
server-addr: 127.0.0.1:8848
```
`application-dev.yml`
```yml
spring:
cloud:
nacos:
config:
# 对应的命名空间
namespace: dev
config:
import:
# ?group=order --> nacos配置的分组
- nacos:common.yaml?group=order
- nacos:datasource.yaml?group=order
```
`application-test.yml`
```yml
spring:
cloud:
nacos:
config:
# 对应的命名空间
namespace: test
config:
import:
# ?group=order --> nacos配置的分组
- nacos:common.yaml?group=order
- nacos:datasource.yaml?group=order
```
`application-prod.yml`
```yml
spring:
cloud:
nacos:
config:
# 对应的命名空间
namespace: prod
config:
import:
# ?group=order --> nacos配置的分组
- nacos:common.yaml?group=order
- nacos:datasource.yaml?group=order
```
`改变application.yml的active后面的值,测试多环境获取到的配置值是否一致`
`dev:`

`test:`

`prod:`

## OpenFeign远程调用
### 坐标
```xml
org.springframework.cloud
spring-cloud-starter-openfeign
```
### 开启远程调用
`@EnableFeignClients注解`
```java
@EnableFeignClients
@SpringBootApplication
@EnableDiscoveryClient
public class OrderApplication {
public static void main(String[] args) {
SpringApplication.run(OrderApplication.class, args);
}
/**
* 启动成功后执行的一次性任务
* @param nacosConfigManager 自动从容器中拿出的配置管理器(原本没有参数,加上之后会自动从容器中拿)
* @return
*/
@Bean
ApplicationRunner applicationRunner(NacosConfigManager nacosConfigManager){
return args -> {
System.out.println("Order服务启动成功");
ConfigService configService = nacosConfigManager.getConfigService();
//参数值参照Nacos配置文件的属性来填写 配置文件ID 配置文件所属组
configService.addListener("service-order.properties", "DEFAULT_GROUP", new Listener() {
@Override
public Executor getExecutor() {
//返回一个固定4个线程的线程池(随意,不一定是4)
return Executors.newFixedThreadPool(4);
}
@Override
public void receiveConfigInfo(String s) {
System.out.println("监听到配置文件更新: " + s);
}
});
};
}
}
```
### 定义远程调用接口
```java
@FeignClient("service-product")
public interface ProductFeignClient {
/**
* 根据id查询商品信息
* @param id
* @return
*/
@GetMapping("/product/{id}")
Product getProductById(@PathVariable("id") Long id);
}
```
### 使用远程调用
```java
@Autowired
private ProductFeignClient productFeignClient;
@Override
public Order createOrder(Long userId, Long productId) {
// Product productByRemote = getProductByRemoteWithLoadBalancerAnnotation(productId);
Product productByRemote = productFeignClient.getProductById(productId);
Order order = new Order();
order.setId(1L);
order.setTotalAmount(new BigDecimal(String.valueOf(productByRemote.getPrice().multiply(new BigDecimal(productByRemote.getNum())))));
order.setUserId(userId);
order.setAddress("甘肃省兰州市城关区雁北路400号");
order.setProductList(Arrays.asList(productByRemote));
return order;
}
```
### 测试
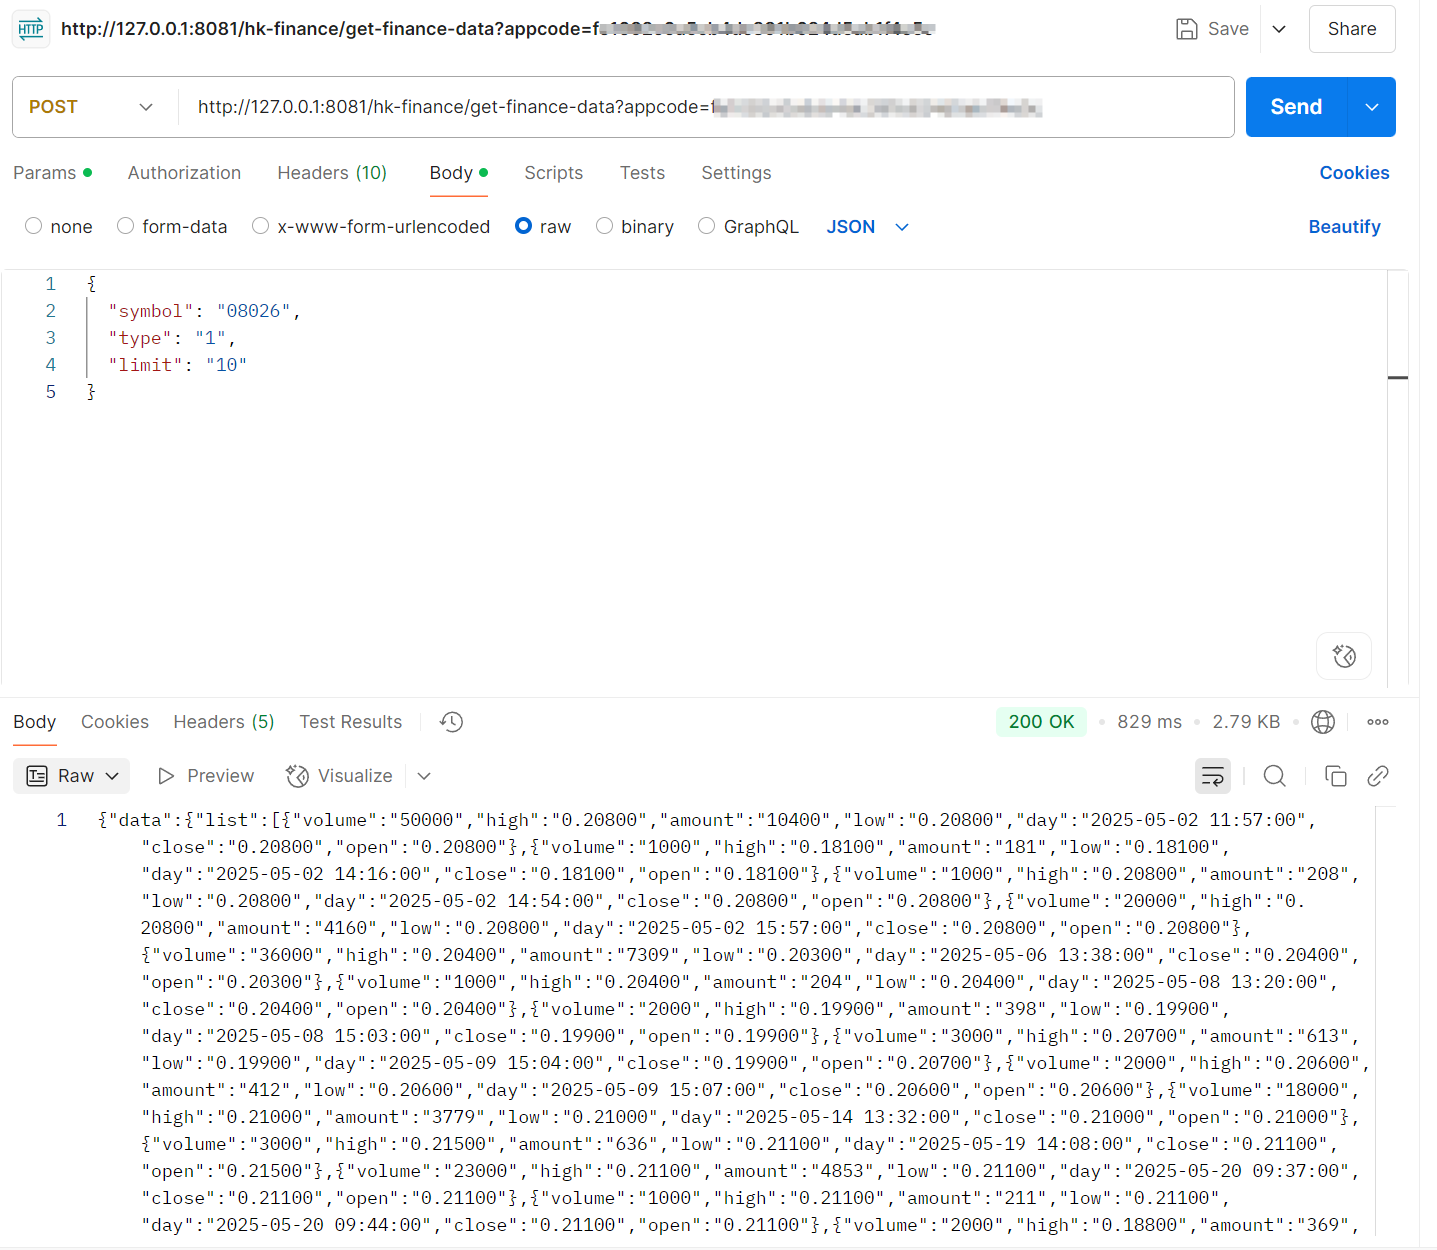
## OpenFeign调用三方接口
### 三方接口
[[聚美智数\]股票实时行情查询_API专区_云市场-阿里云](https://market.aliyun.com/apimarket/detail/cmapi00065924?spm=5176.28663977.J_tds7u7INVs2Clozcb3f5f.44.5f07e69fHHwy11&innerSource=search#sku=yuncode5992400001)
调用示例:[[聚美智数\]股票实时行情查询_API专区_云市场-阿里云](https://market.aliyun.com/apimarket/detail/cmapi00065924?spm=5176.28663977.J_tds7u7INVs2Clozcb3f5f.44.5f07e69fHHwy11&innerSource=search#sku=yuncode5992400001)
### 定义请求参数
```java
@Data
public class HkStocksKline implements Serializable {
private String symbol;
private String type;
private String limit;
}
```
### 定义远程调用接口
```java
@FeignClient(name = "hk-finance",url="https://jmqqgphqcx.market.alicloudapi.com")
public interface HkFinanceFeignClient {
@PostMapping(value = "/finance/hk-stocks-kline", consumes = MediaType.APPLICATION_FORM_URLENCODED_VALUE)
String getHkFinanceData(@RequestHeader("Authorization") String appcode,
@RequestBody HkStocksKline hkStocksKline);
}
```
### 定义测试的Controller
```java
@RestController
@RequestMapping("/hk-finance")
public class HkFinanceController {
@Autowired
private HkFinanceFeignClient hkFinanceFeignClient;
@PostMapping("/get-finance-data")
public String getFinanceData(@RequestParam("appcode") String appcode, @RequestBody HkStocksKline hkStocksKline) {
System.out.println(appcode);
String auth = "APPCODE " + appcode;
System.out.println(auth);
return hkFinanceFeignClient.getHkFinanceData(auth, hkStocksKline);
}
}
```
### 测试
使用`PostMan`等工具
## OpenFeign 日志
### 配置日志级别
```yaml
# openfeign的日志级别
logging:
level:
io.xccit.order.feign: debug
```
### 将Feign的Logger注入到容器
```java
/**
* feign日志级别
* @return
*/
@Bean
public Logger.Level feignLoggerLevel(){
return Logger.Level.FULL;
}
```
### 测试
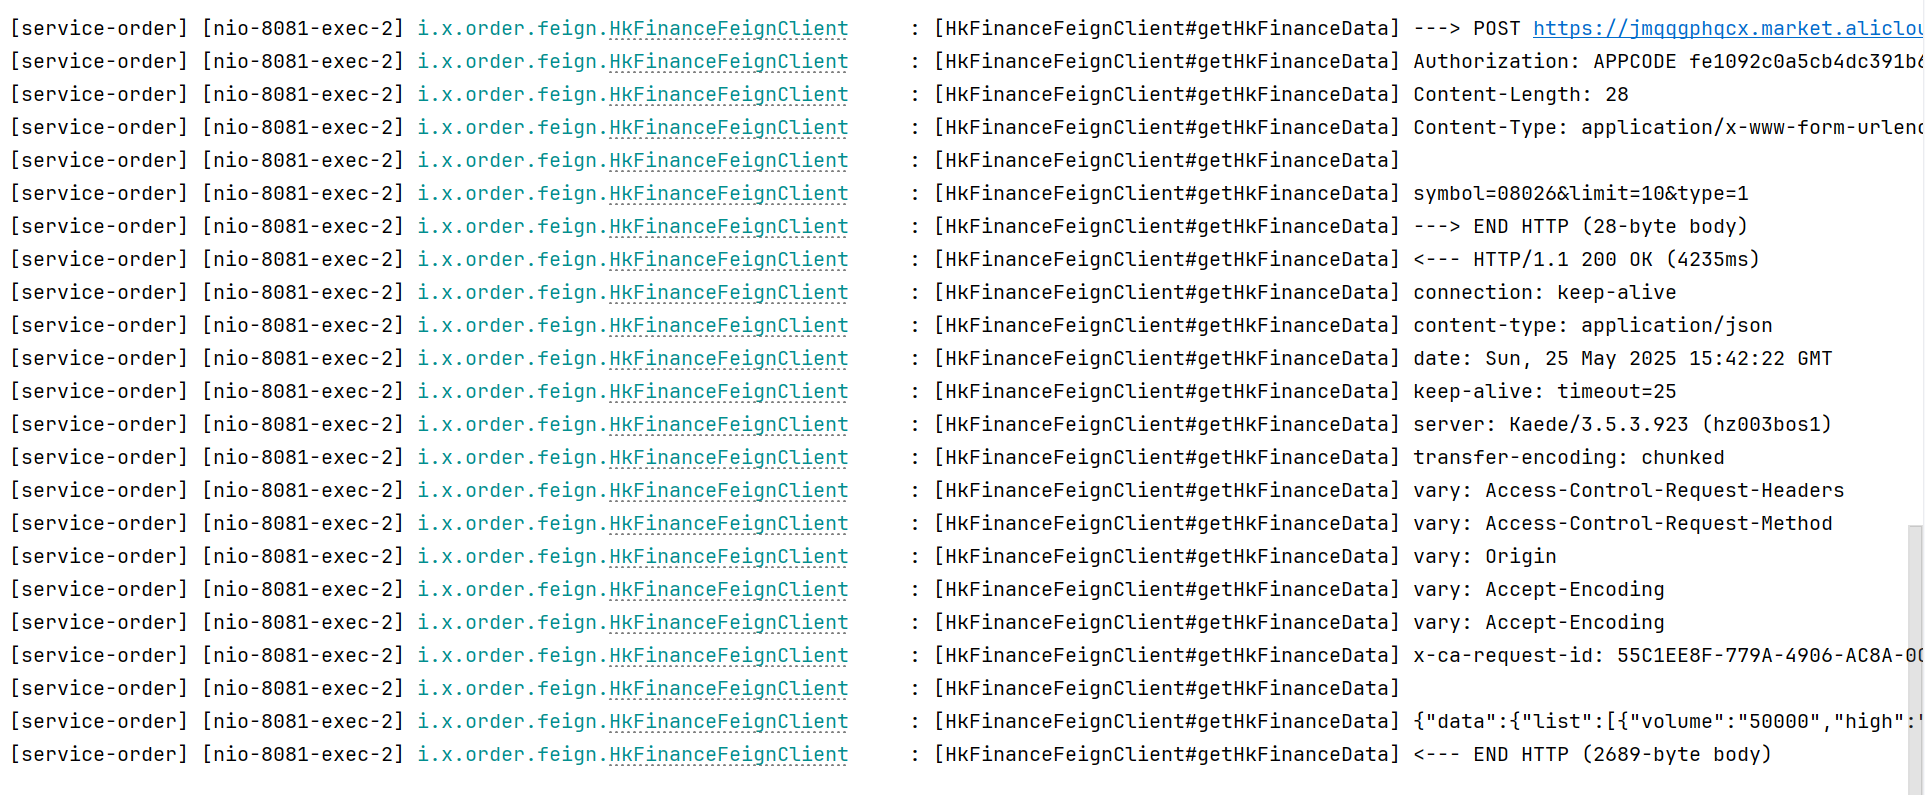
`这样,只有配置了日志的包下的远程调用会打印日志`
## OpenFeign 超时控制
### 默认等待时间
`连接超时:`10s
`请求超时:`60s
### 修改商品业务代码
```java
@Service
public class ProductServiceImpl implements ProductService {
@Override
public Product getProductById(Long id) {
Product product = new Product();
product.setId(id);
product.setPrice(new BigDecimal("88.88"));
product.setProductName("《JavaWEB响应式编程实战》");
product.setNum(100);
//模拟超时
try {
TimeUnit.SECONDS.sleep(100);
} catch (InterruptedException e) {
throw new RuntimeException(e);
}
return product;
}
}
```
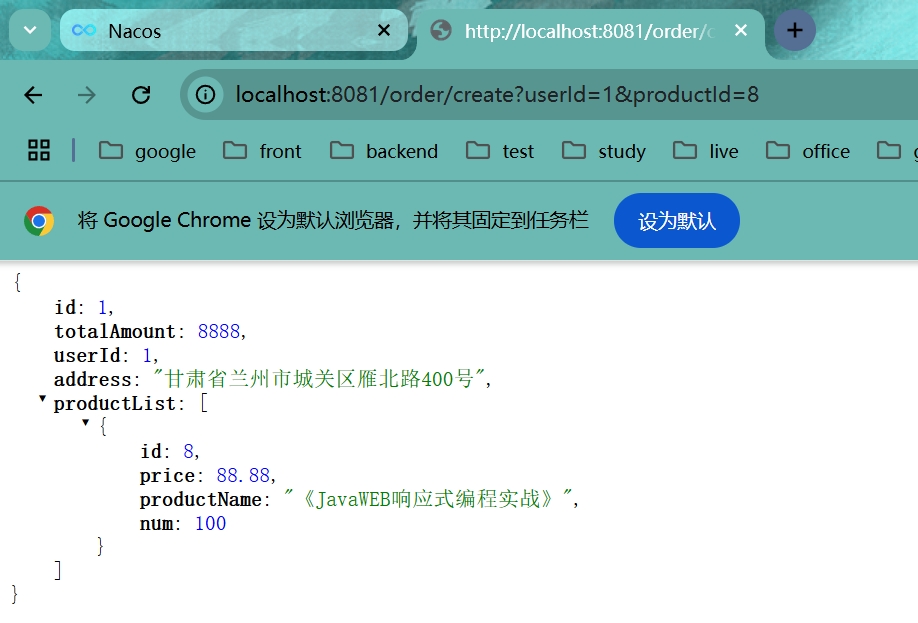
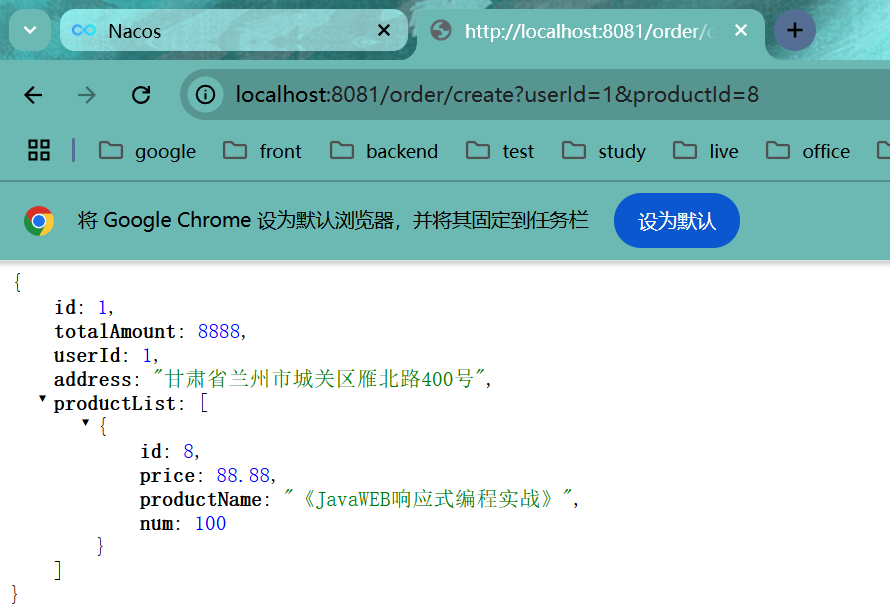
### 请求订单创建接口
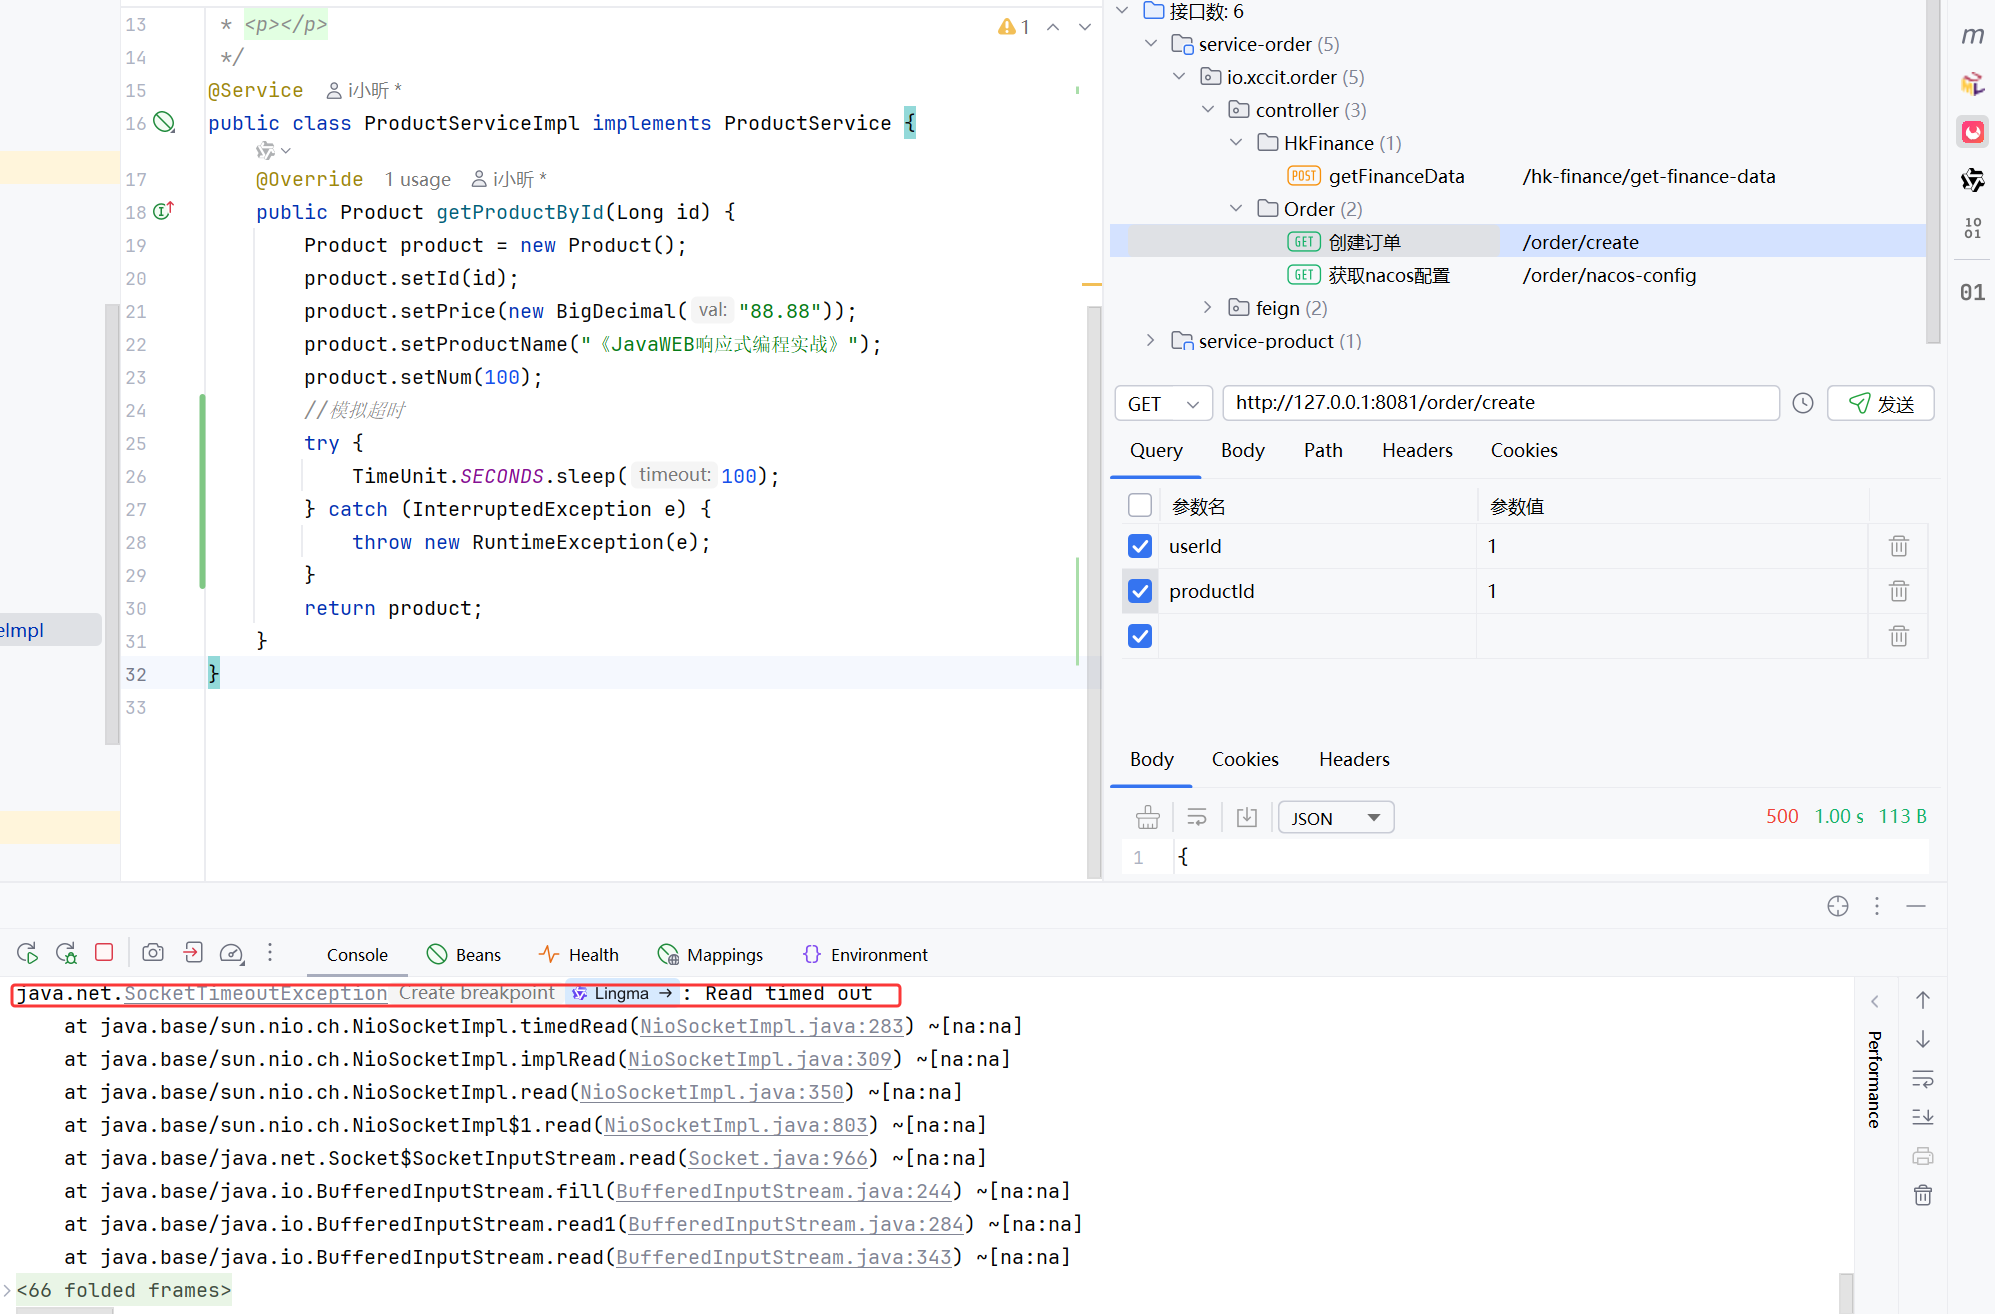
`请求超时`
### 修改超时等待时间
[Spring Cloud OpenFeign Features :: Spring Cloud Openfeign](https://docs.spring.io/spring-cloud-openfeign/reference/spring-cloud-openfeign.html#spring-cloud-feign-overriding-defaults)
`文档示例`
```yaml
spring:
cloud:
openfeign:
client:
config:
feignName:
url: http://remote-service.com
connectTimeout: 5000
readTimeout: 5000
loggerLevel: full
errorDecoder: com.example.SimpleErrorDecoder
retryer: com.example.SimpleRetryer
defaultQueryParameters:
query: queryValue
defaultRequestHeaders:
header: headerValue
requestInterceptors:
- com.example.FooRequestInterceptor
- com.example.BarRequestInterceptor
responseInterceptor: com.example.BazResponseInterceptor
dismiss404: false
encoder: com.example.SimpleEncoder
decoder: com.example.SimpleDecoder
contract: com.example.SimpleContract
capabilities:
- com.example.FooCapability
- com.example.BarCapability
queryMapEncoder: com.example.SimpleQueryMapEncoder
micrometer.enabled: false
```
`application-feign.yaml`
```yaml
spring:
cloud:
openfeign:
client:
config:
# 默认配置,未配置的远程调用客户端使用此默认配置
default:
logger-level: full
connect-timeout: 1000
read-timeout: 5000
service-product:
logger-level: full
# 单位: ms
connect-timeout: 3000
read-timeout: 5000
```
### 再次启动测试
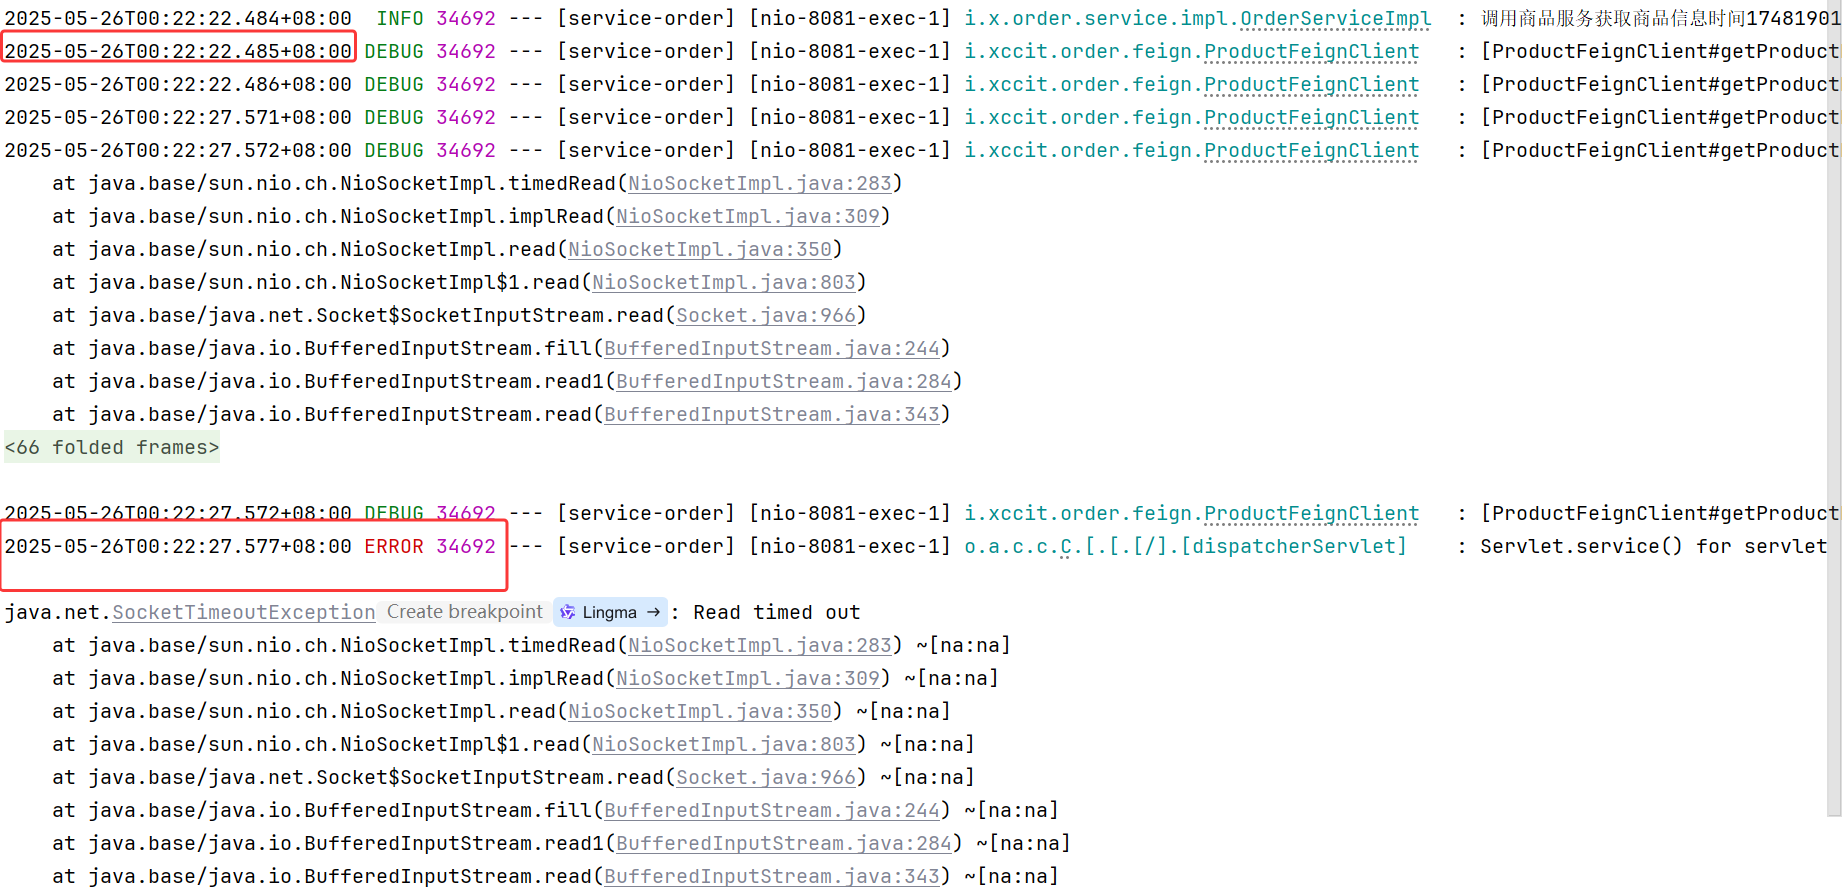
`这次仅用5秒就返回结果`
## OpenFeign重试机制
### 核心配置
```java
/**
* feign重试机制
* @return
*/
@Bean
public Retryer retryer(){
return new Retryer.Default();
}
```
> 将以上代码配置到远程调用的配置类中,默认的重试器就好了,重启项目测试即可。

这样,如果没有调用成功,便会自动进行重试。
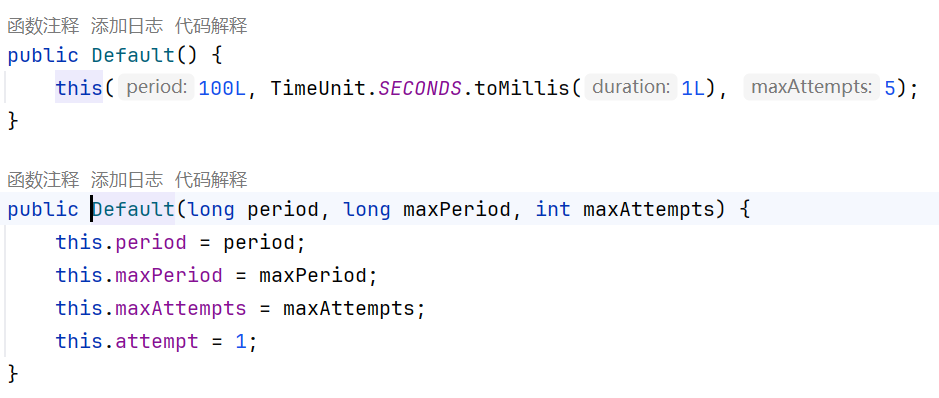
> 查看Retryer.Default的源码看到,请求间隔100ms,最大间隔1s,最多重试5次,可以在new Retryer.Default时可以传值。
## OpenFeign请求拦截器
### 配置请求拦截器
#### 全局有效
```java
@Component
public class XTokenRequestInterceptor implements RequestInterceptor {
@Override
public void apply(RequestTemplate requestTemplate) {
// 设置X-Token请求头,值为随机生成的UUID字符串
requestTemplate.header("X-Token", UUID.randomUUID().toString());
System.out.println("X-TokenRequestInterceptor");
}
}
```
#### 仅对某个服务有效
> 将拦截器不要注入到容器,取消`@Component`注解
```yaml
service-product:
logger-level: full
# 单位: ms
connect-timeout: 3000
read-timeout: 5000
# 自定义拦截器,多个用逗号分隔,仅对当前服务有效
request-interceptors:
- io.xccit.order.interceptor.XTokenRequestInterceptor
```
### 重启测试
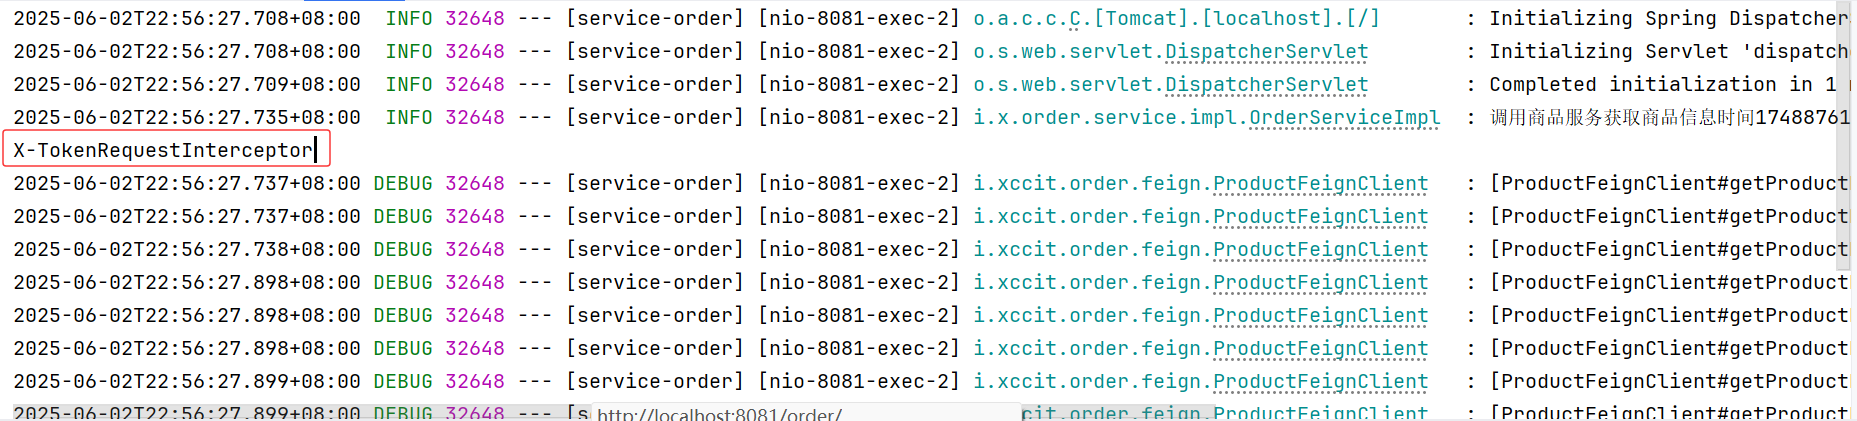
> 请求拦截器对多种业务场景是非常有效的,例如登录后下单,远程调用商品信息时,登录的Token会丢失,使用请求拦截器,每次远程调用时总是带上Token,这样就能请求到需要验证Token的接口信息。
### 验证请求时携带的Token与远程接口接收到的Token
```java
@Component
public class XTokenRequestInterceptor implements RequestInterceptor {
@Override
public void apply(RequestTemplate requestTemplate) {
// 设置X-Token请求头,值为随机生成的UUID字符串
String xtoken = UUID.randomUUID().toString();
requestTemplate.header("X-Token", xtoken);
System.out.println("X-TokenRequestInterceptor:" + xtoken);
}
}
```
```java
@GetMapping("/{id}")
public Product getProductById(@PathVariable Long id,
HttpServletRequest request) {
String header = request.getHeader("X-Token");
System.out.println("X-Token:"+header);
return productService.getProductById(id);
}
```
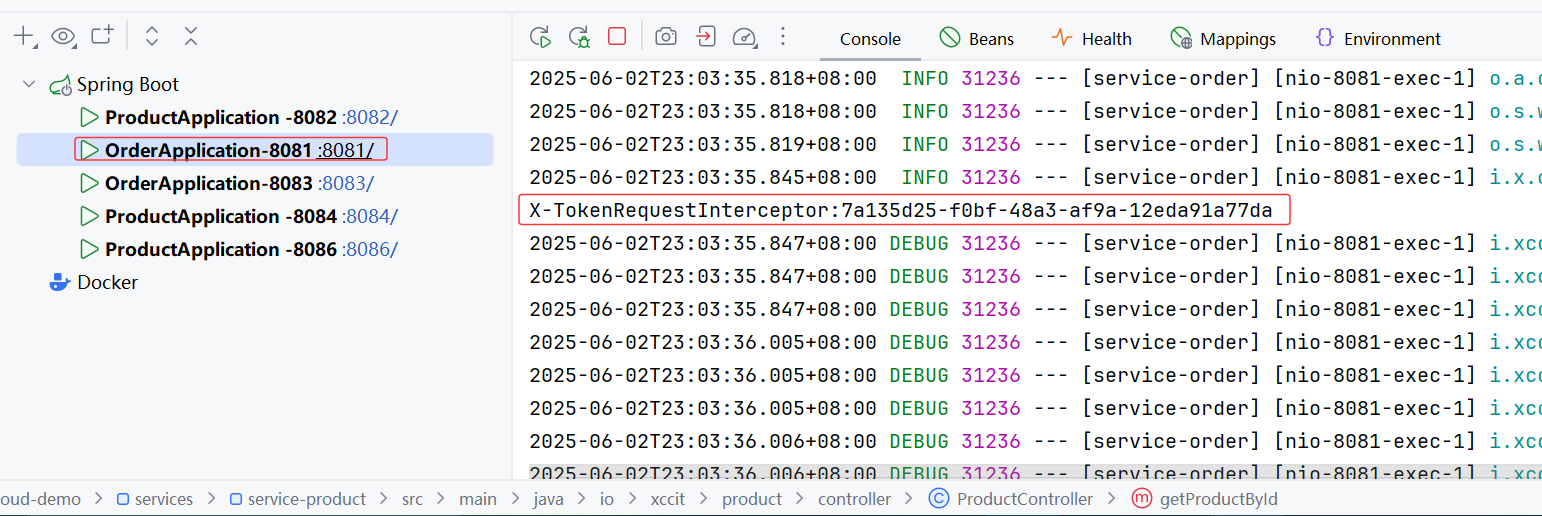
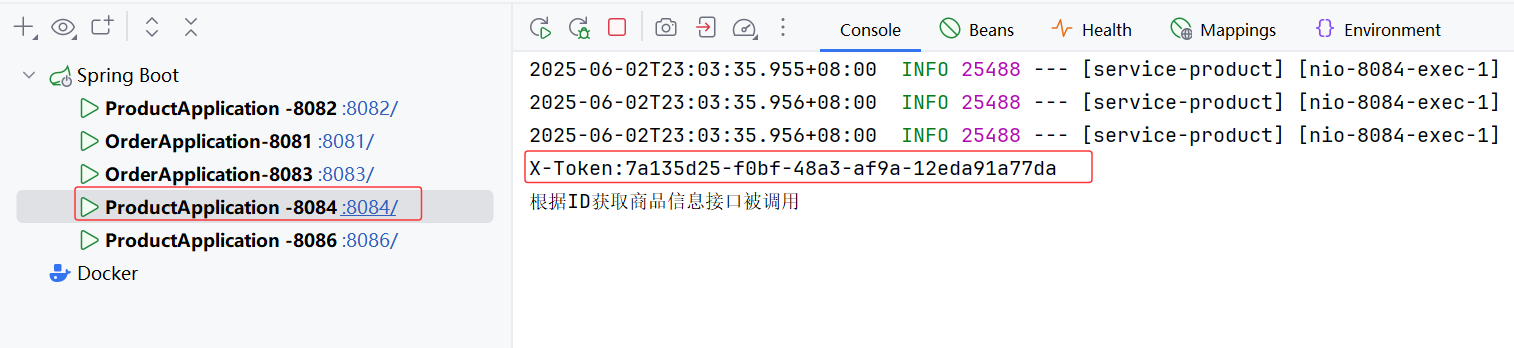
> 接收到的XToken是一致的
## OpenFeign兜底返回
> 兜底返回是指远程调用失败后兜底的数据,数据可以从缓存中拿,也可以直接使用一些有特征的假数据,告诉用户目前这个服务可能有问题而不是直接报错。
### 配置商品服务兜底返回
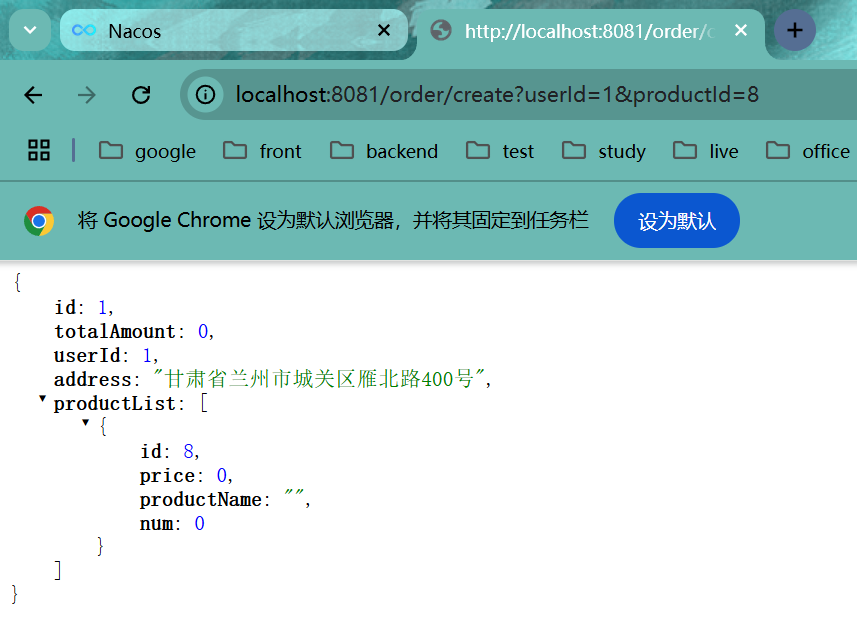
```java
@Component
public class ProductClientFallBack implements ProductFeignClient {
/**
* 根据id查询商品信息
*
* @param id
* @return
*/
@Override
public Product getProductById(Long id) {
Product product = new Product();
product.setId(id);
product.setPrice(new BigDecimal("0"));
product.setProductName("");
product.setNum(0);
return product;
}
}
```
### 测试
#### 1.关闭重试器
```java
/**
* feign重试机制
* @return
*/
// @Bean
// public Retryer retryer(){
// return new Retryer.Default();
// }
}
```
#### 2.在远程客户端接口指定兜底返回的类
```java
@FeignClient(name = "service-product",fallback = ProductClientFallBack.class)
public interface ProductFeignClient {
/**
* 根据id查询商品信息
* @param id
* @return
*/
@GetMapping("/product/{id}")
Product getProductById(@PathVariable("id") Long id);
}
```
#### 3.重启
`正常调用`
`关闭商品服务`

> 这里报错的原因是需要配合`Sentinel框架`来实现,只需要知道兜底返回的用法即可。
## 使用Sentinel完成兜底返回
### 整合Sentinel
```xml
com.alibaba.cloud
spring-cloud-starter-alibaba-sentinel
```
### 配置熔断功能开启
```yaml
# 开启Sentinel对Feign的支持
feign:
sentinel:
enabled: true
```
### 重启测试
> 返回了兜底返回配置的数据
## Sentinel框架
### Sentinel简介
官方文档:[introduction | Sentinel](https://sentinelguard.io/zh-cn/docs/introduction.html)
#### 资源
资源是 Sentinel 的关键概念。它可以是 Java 应用程序中的任何内容,例如,由应用程序提供的服务,或由应用程序调用的其它应用提供的服务,甚至可以是一段代码。在接下来的文档中,我们都会用资源来描述代码块。
只要通过 Sentinel API 定义的代码,就是资源,能够被 Sentinel 保护起来。大部分情况下,可以使用方法签名,URL,甚至服务名称作为资源名来标示资源。
#### 规则
围绕资源的实时状态设定的规则,可以包括流量控制规则、熔断降级规则以及系统保护规则。所有规则可以动态实时调整。
### 安装Sentinel
`使用Docker`
```shell
docker pull bladex/sentinel-dashboard
docker run --name sentinel -d -p 8858:8858 bladex/sentinel-dashboard
```
> 官方文档有windows版的jar文件,也可以使用,默认8080端口,默认登录用户名密码:`sentinel/sentinel`
>
> [Releases · alibaba/Sentinel](https://github.com/alibaba/Sentinel/releases)
### 整合Sentinel
在`services(微服务模块的父级模块)`中导入Sentinel依赖
```xml
com.alibaba.cloud
spring-cloud-starter-alibaba-sentinel
```
为每个服务模块的`配置文件`中配置Sentinel控制台
```yaml
spring:
cloud:
sentinel:
transport:
dashboard: localhost:8858
enabled: true
# 开启懒加载
eager: true
```
`浏览器`访问控制台URL:`localhost:8858`,登录

> 这样就完成了初步的整合
### 测试接口流控
#### 1.定义资源
```java
@SentinelResource(value = "createOrder")
@Override
public Order createOrder(Long userId, Long productId) {
// Product productByRemote = getProductByRemoteWithLoadBalancerAnnotation(productId);
log.info("调用商品服务获取商品信息时间{}", System.currentTimeMillis());
Product productByRemote = productFeignClient.getProductById(productId);
Order order = new Order();
order.setId(1L);
order.setTotalAmount(new BigDecimal(String.valueOf(productByRemote.getPrice().multiply(new BigDecimal(productByRemote.getNum())))));
order.setUserId(userId);
order.setAddress("甘肃省兰州市城关区雁北路400号");
order.setProductList(Arrays.asList(productByRemote));
log.info("调用商品服务获取商品信息后时间{}", System.currentTimeMillis());
return order;
}
```
#### 2.重启并访问该接口

### 配置优先级
`先导入优先`--->`外部优先`
先导入优先:导入多个配置后,按照声明的优先级生效,相同配置的值以先导入的为主
外部优先:外部配置比本地配置文件的优先级更高
`外部配置+本地配置`合并后,生成一个配置列表,程序启动后,配置列表加载到项目的环境变量中去,以后要获取的配置按照项目的环境变量中的值为准
### 数据隔离
微服务开发中,模块多,配置也多,如果配置都在一起,容易混淆且不好管理,这个时候就需要配置`数据隔离`
#### 1.Naocs命名空间
`默认只有一个public`

`创建多个`

#### 2.为服务创建多个配置
`分别点击不同的命名空间,创建配置文件`

`通用配置common.yaml`
```yaml
order:
time-out: 30min
```
`数据源datasource.yaml`
```yaml
order:
jdbc-driver-class: com.mysql.jdbc.cj.Driver
url: jdbc:mysql://localhost:3306/service-order?useUnicode=true&characterEncoding=UTF-8&serverTimezone=Asia/Shanghai
username: root
password: root
```
`其他命名空间中,可以使用克隆来快速复制配置数据`


> `Tips:`克隆后记得修改配置,以免测试时无法区分
#### 3.按需加载
`order模块的application.yml`
```yaml
server:
port: 8081
spring:
application:
name: service-order
cloud:
nacos:
discovery:
server-addr: 127.0.0.1:8848
config:
# 对应的命名空间
namespace: dev
config:
import:
# ?group=order --> nacos配置的分组
- nacos:common.yaml?group=order
- nacos:datasource.yaml?group=order
```
`OrderNacosProperties.java`
```java
@Component
@Data
@ConfigurationProperties(prefix = "order")
public class OrderNacosProperties {
private String timeOut;
private String jdbcDriverClass;
private String url;
private String username;
private String password;
}
```
`OrderController.java`
```java
@RestController
@RequestMapping("/order")
public class OrderController {
@Autowired
private OrderService orderService;
@Autowired
private OrderNacosProperties orderNacosProperties;
/**
* 创建订单
* @param userId
* @param productId
* @return
*/
@GetMapping("/create")
public Order createOrder(Long userId, Long productId) {
return orderService.createOrder(userId, productId);
}
/**
* 获取nacos配置
* @return
*/
@GetMapping("/nacos-config")
public String getNacosConfig() {
return orderNacosProperties.toString();
}
}
```
`重启测试`

`日志中也有信息,后面success表示前面的配置加载成功`

#### 4.不同环境动态加载
使用`SpringBoot的多环境激活配置`
`application.yml`
```yml
server:
port: 8081
spring:
application:
name: service-order
profiles:
# 激活的环境配置
active: dev
cloud:
nacos:
discovery:
server-addr: 127.0.0.1:8848
```
`application-dev.yml`
```yml
spring:
cloud:
nacos:
config:
# 对应的命名空间
namespace: dev
config:
import:
# ?group=order --> nacos配置的分组
- nacos:common.yaml?group=order
- nacos:datasource.yaml?group=order
```
`application-test.yml`
```yml
spring:
cloud:
nacos:
config:
# 对应的命名空间
namespace: test
config:
import:
# ?group=order --> nacos配置的分组
- nacos:common.yaml?group=order
- nacos:datasource.yaml?group=order
```
`application-prod.yml`
```yml
spring:
cloud:
nacos:
config:
# 对应的命名空间
namespace: prod
config:
import:
# ?group=order --> nacos配置的分组
- nacos:common.yaml?group=order
- nacos:datasource.yaml?group=order
```
`改变application.yml的active后面的值,测试多环境获取到的配置值是否一致`
`dev:`

`test:`

`prod:`

## OpenFeign远程调用
### 坐标
```xml
org.springframework.cloud
spring-cloud-starter-openfeign
```
### 开启远程调用
`@EnableFeignClients注解`
```java
@EnableFeignClients
@SpringBootApplication
@EnableDiscoveryClient
public class OrderApplication {
public static void main(String[] args) {
SpringApplication.run(OrderApplication.class, args);
}
/**
* 启动成功后执行的一次性任务
* @param nacosConfigManager 自动从容器中拿出的配置管理器(原本没有参数,加上之后会自动从容器中拿)
* @return
*/
@Bean
ApplicationRunner applicationRunner(NacosConfigManager nacosConfigManager){
return args -> {
System.out.println("Order服务启动成功");
ConfigService configService = nacosConfigManager.getConfigService();
//参数值参照Nacos配置文件的属性来填写 配置文件ID 配置文件所属组
configService.addListener("service-order.properties", "DEFAULT_GROUP", new Listener() {
@Override
public Executor getExecutor() {
//返回一个固定4个线程的线程池(随意,不一定是4)
return Executors.newFixedThreadPool(4);
}
@Override
public void receiveConfigInfo(String s) {
System.out.println("监听到配置文件更新: " + s);
}
});
};
}
}
```
### 定义远程调用接口
```java
@FeignClient("service-product")
public interface ProductFeignClient {
/**
* 根据id查询商品信息
* @param id
* @return
*/
@GetMapping("/product/{id}")
Product getProductById(@PathVariable("id") Long id);
}
```
### 使用远程调用
```java
@Autowired
private ProductFeignClient productFeignClient;
@Override
public Order createOrder(Long userId, Long productId) {
// Product productByRemote = getProductByRemoteWithLoadBalancerAnnotation(productId);
Product productByRemote = productFeignClient.getProductById(productId);
Order order = new Order();
order.setId(1L);
order.setTotalAmount(new BigDecimal(String.valueOf(productByRemote.getPrice().multiply(new BigDecimal(productByRemote.getNum())))));
order.setUserId(userId);
order.setAddress("甘肃省兰州市城关区雁北路400号");
order.setProductList(Arrays.asList(productByRemote));
return order;
}
```
### 测试

## OpenFeign调用三方接口
### 三方接口
[[聚美智数\]股票实时行情查询_API专区_云市场-阿里云](https://market.aliyun.com/apimarket/detail/cmapi00065924?spm=5176.28663977.J_tds7u7INVs2Clozcb3f5f.44.5f07e69fHHwy11&innerSource=search#sku=yuncode5992400001)
调用示例:[[聚美智数\]股票实时行情查询_API专区_云市场-阿里云](https://market.aliyun.com/apimarket/detail/cmapi00065924?spm=5176.28663977.J_tds7u7INVs2Clozcb3f5f.44.5f07e69fHHwy11&innerSource=search#sku=yuncode5992400001)
### 定义请求参数
```java
@Data
public class HkStocksKline implements Serializable {
private String symbol;
private String type;
private String limit;
}
```
### 定义远程调用接口
```java
@FeignClient(name = "hk-finance",url="https://jmqqgphqcx.market.alicloudapi.com")
public interface HkFinanceFeignClient {
@PostMapping(value = "/finance/hk-stocks-kline", consumes = MediaType.APPLICATION_FORM_URLENCODED_VALUE)
String getHkFinanceData(@RequestHeader("Authorization") String appcode,
@RequestBody HkStocksKline hkStocksKline);
}
```
### 定义测试的Controller
```java
@RestController
@RequestMapping("/hk-finance")
public class HkFinanceController {
@Autowired
private HkFinanceFeignClient hkFinanceFeignClient;
@PostMapping("/get-finance-data")
public String getFinanceData(@RequestParam("appcode") String appcode, @RequestBody HkStocksKline hkStocksKline) {
System.out.println(appcode);
String auth = "APPCODE " + appcode;
System.out.println(auth);
return hkFinanceFeignClient.getHkFinanceData(auth, hkStocksKline);
}
}
```
### 测试
使用`PostMan`等工具

## OpenFeign 日志
### 配置日志级别
```yaml
# openfeign的日志级别
logging:
level:
io.xccit.order.feign: debug
```
### 将Feign的Logger注入到容器
```java
/**
* feign日志级别
* @return
*/
@Bean
public Logger.Level feignLoggerLevel(){
return Logger.Level.FULL;
}
```
### 测试

`这样,只有配置了日志的包下的远程调用会打印日志`
## OpenFeign 超时控制
### 默认等待时间
`连接超时:`10s
`请求超时:`60s
### 修改商品业务代码
```java
@Service
public class ProductServiceImpl implements ProductService {
@Override
public Product getProductById(Long id) {
Product product = new Product();
product.setId(id);
product.setPrice(new BigDecimal("88.88"));
product.setProductName("《JavaWEB响应式编程实战》");
product.setNum(100);
//模拟超时
try {
TimeUnit.SECONDS.sleep(100);
} catch (InterruptedException e) {
throw new RuntimeException(e);
}
return product;
}
}
```
### 请求订单创建接口

`请求超时`
### 修改超时等待时间
[Spring Cloud OpenFeign Features :: Spring Cloud Openfeign](https://docs.spring.io/spring-cloud-openfeign/reference/spring-cloud-openfeign.html#spring-cloud-feign-overriding-defaults)
`文档示例`
```yaml
spring:
cloud:
openfeign:
client:
config:
feignName:
url: http://remote-service.com
connectTimeout: 5000
readTimeout: 5000
loggerLevel: full
errorDecoder: com.example.SimpleErrorDecoder
retryer: com.example.SimpleRetryer
defaultQueryParameters:
query: queryValue
defaultRequestHeaders:
header: headerValue
requestInterceptors:
- com.example.FooRequestInterceptor
- com.example.BarRequestInterceptor
responseInterceptor: com.example.BazResponseInterceptor
dismiss404: false
encoder: com.example.SimpleEncoder
decoder: com.example.SimpleDecoder
contract: com.example.SimpleContract
capabilities:
- com.example.FooCapability
- com.example.BarCapability
queryMapEncoder: com.example.SimpleQueryMapEncoder
micrometer.enabled: false
```
`application-feign.yaml`
```yaml
spring:
cloud:
openfeign:
client:
config:
# 默认配置,未配置的远程调用客户端使用此默认配置
default:
logger-level: full
connect-timeout: 1000
read-timeout: 5000
service-product:
logger-level: full
# 单位: ms
connect-timeout: 3000
read-timeout: 5000
```
### 再次启动测试

`这次仅用5秒就返回结果`
## OpenFeign重试机制
### 核心配置
```java
/**
* feign重试机制
* @return
*/
@Bean
public Retryer retryer(){
return new Retryer.Default();
}
```
> 将以上代码配置到远程调用的配置类中,默认的重试器就好了,重启项目测试即可。

这样,如果没有调用成功,便会自动进行重试。

> 查看Retryer.Default的源码看到,请求间隔100ms,最大间隔1s,最多重试5次,可以在new Retryer.Default时可以传值。
## OpenFeign请求拦截器
### 配置请求拦截器
#### 全局有效
```java
@Component
public class XTokenRequestInterceptor implements RequestInterceptor {
@Override
public void apply(RequestTemplate requestTemplate) {
// 设置X-Token请求头,值为随机生成的UUID字符串
requestTemplate.header("X-Token", UUID.randomUUID().toString());
System.out.println("X-TokenRequestInterceptor");
}
}
```
#### 仅对某个服务有效
> 将拦截器不要注入到容器,取消`@Component`注解
```yaml
service-product:
logger-level: full
# 单位: ms
connect-timeout: 3000
read-timeout: 5000
# 自定义拦截器,多个用逗号分隔,仅对当前服务有效
request-interceptors:
- io.xccit.order.interceptor.XTokenRequestInterceptor
```
### 重启测试


> 请求拦截器对多种业务场景是非常有效的,例如登录后下单,远程调用商品信息时,登录的Token会丢失,使用请求拦截器,每次远程调用时总是带上Token,这样就能请求到需要验证Token的接口信息。
### 验证请求时携带的Token与远程接口接收到的Token
```java
@Component
public class XTokenRequestInterceptor implements RequestInterceptor {
@Override
public void apply(RequestTemplate requestTemplate) {
// 设置X-Token请求头,值为随机生成的UUID字符串
String xtoken = UUID.randomUUID().toString();
requestTemplate.header("X-Token", xtoken);
System.out.println("X-TokenRequestInterceptor:" + xtoken);
}
}
```
```java
@GetMapping("/{id}")
public Product getProductById(@PathVariable Long id,
HttpServletRequest request) {
String header = request.getHeader("X-Token");
System.out.println("X-Token:"+header);
return productService.getProductById(id);
}
```


> 接收到的XToken是一致的
## OpenFeign兜底返回
> 兜底返回是指远程调用失败后兜底的数据,数据可以从缓存中拿,也可以直接使用一些有特征的假数据,告诉用户目前这个服务可能有问题而不是直接报错。
### 配置商品服务兜底返回
```java
@Component
public class ProductClientFallBack implements ProductFeignClient {
/**
* 根据id查询商品信息
*
* @param id
* @return
*/
@Override
public Product getProductById(Long id) {
Product product = new Product();
product.setId(id);
product.setPrice(new BigDecimal("0"));
product.setProductName("");
product.setNum(0);
return product;
}
}
```
### 测试
#### 1.关闭重试器
```java
/**
* feign重试机制
* @return
*/
// @Bean
// public Retryer retryer(){
// return new Retryer.Default();
// }
}
```
#### 2.在远程客户端接口指定兜底返回的类
```java
@FeignClient(name = "service-product",fallback = ProductClientFallBack.class)
public interface ProductFeignClient {
/**
* 根据id查询商品信息
* @param id
* @return
*/
@GetMapping("/product/{id}")
Product getProductById(@PathVariable("id") Long id);
}
```
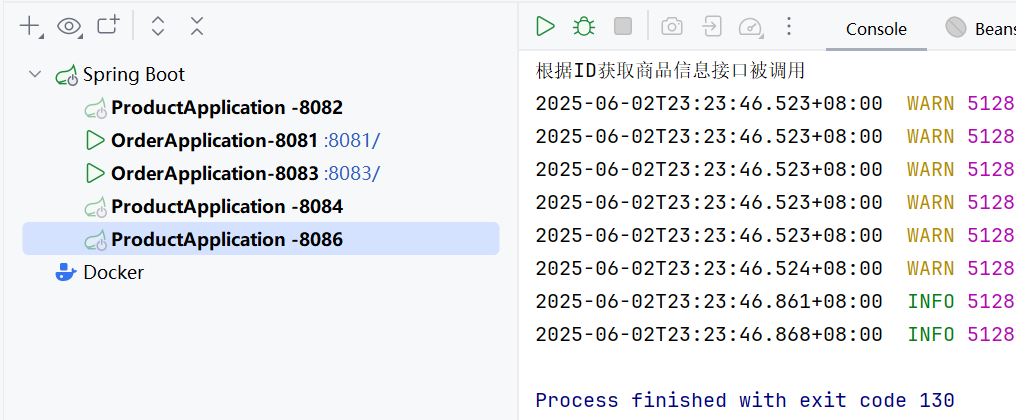
#### 3.重启
`正常调用`

`关闭商品服务`


> 这里报错的原因是需要配合`Sentinel框架`来实现,只需要知道兜底返回的用法即可。
## 使用Sentinel完成兜底返回
### 整合Sentinel
```xml
com.alibaba.cloud
spring-cloud-starter-alibaba-sentinel
```
### 配置熔断功能开启
```yaml
# 开启Sentinel对Feign的支持
feign:
sentinel:
enabled: true
```
### 重启测试

> 返回了兜底返回配置的数据
## Sentinel框架
### Sentinel简介
官方文档:[introduction | Sentinel](https://sentinelguard.io/zh-cn/docs/introduction.html)
#### 资源
资源是 Sentinel 的关键概念。它可以是 Java 应用程序中的任何内容,例如,由应用程序提供的服务,或由应用程序调用的其它应用提供的服务,甚至可以是一段代码。在接下来的文档中,我们都会用资源来描述代码块。
只要通过 Sentinel API 定义的代码,就是资源,能够被 Sentinel 保护起来。大部分情况下,可以使用方法签名,URL,甚至服务名称作为资源名来标示资源。
#### 规则
围绕资源的实时状态设定的规则,可以包括流量控制规则、熔断降级规则以及系统保护规则。所有规则可以动态实时调整。
### 安装Sentinel
`使用Docker`
```shell
docker pull bladex/sentinel-dashboard
docker run --name sentinel -d -p 8858:8858 bladex/sentinel-dashboard
```
> 官方文档有windows版的jar文件,也可以使用,默认8080端口,默认登录用户名密码:`sentinel/sentinel`
>
> [Releases · alibaba/Sentinel](https://github.com/alibaba/Sentinel/releases)
### 整合Sentinel
在`services(微服务模块的父级模块)`中导入Sentinel依赖
```xml
com.alibaba.cloud
spring-cloud-starter-alibaba-sentinel
```
为每个服务模块的`配置文件`中配置Sentinel控制台
```yaml
spring:
cloud:
sentinel:
transport:
dashboard: localhost:8858
enabled: true
# 开启懒加载
eager: true
```
`浏览器`访问控制台URL:`localhost:8858`,登录

> 这样就完成了初步的整合
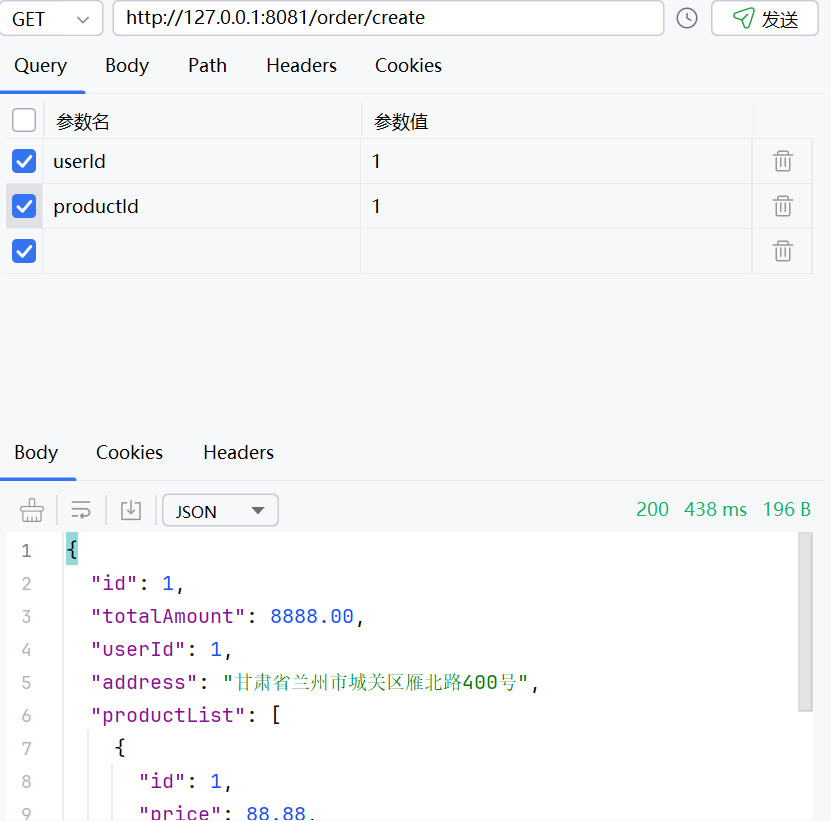
### 测试接口流控
#### 1.定义资源
```java
@SentinelResource(value = "createOrder")
@Override
public Order createOrder(Long userId, Long productId) {
// Product productByRemote = getProductByRemoteWithLoadBalancerAnnotation(productId);
log.info("调用商品服务获取商品信息时间{}", System.currentTimeMillis());
Product productByRemote = productFeignClient.getProductById(productId);
Order order = new Order();
order.setId(1L);
order.setTotalAmount(new BigDecimal(String.valueOf(productByRemote.getPrice().multiply(new BigDecimal(productByRemote.getNum())))));
order.setUserId(userId);
order.setAddress("甘肃省兰州市城关区雁北路400号");
order.setProductList(Arrays.asList(productByRemote));
log.info("调用商品服务获取商品信息后时间{}", System.currentTimeMillis());
return order;
}
```
#### 2.重启并访问该接口
 #### 3.查看资源

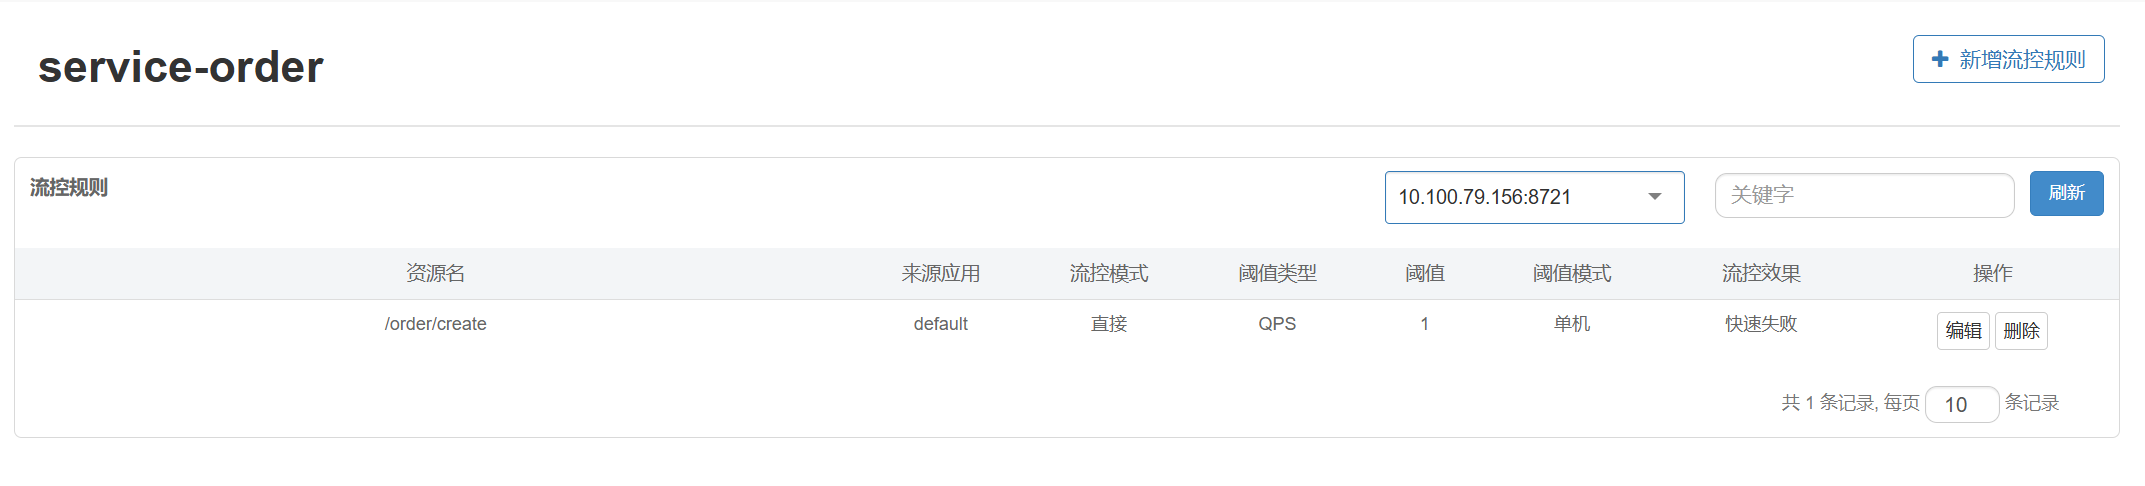
#### 4.设置流控
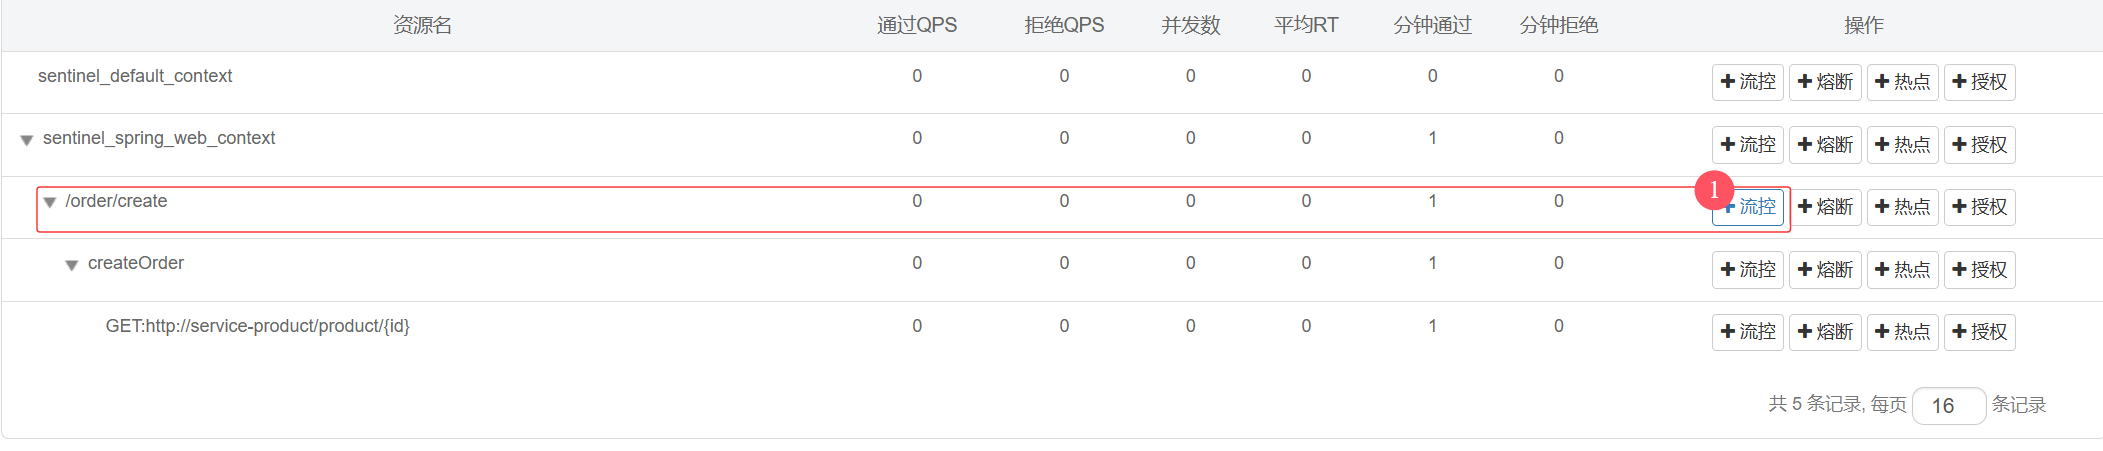

> `QPS:`单机每秒访问量
>
> `并发线程数:`单机每秒线程处理数量
这里设置为`单机每秒`只能处理`1`个请求
#### 5.重启测试
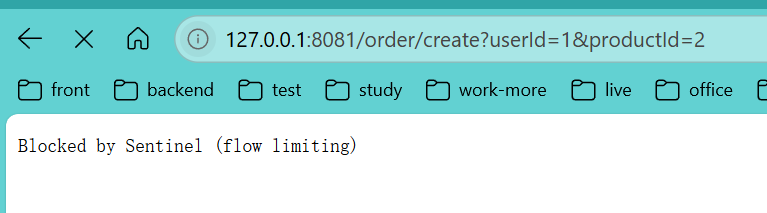
`当你快速刷新时,便会报错,需要注意:如果电脑处理快,可以把每秒处理的请求放多一点,比如设置为5,疯狂刷新浏览器,超过5次就会报错`
### 处理web异常
#### 1.定义统一资源返回对象
`放置在model模块下即可`
```java
@Data
@Builder
@NoArgsConstructor
@AllArgsConstructor
@ToString
public class AjaxResult {
private Integer code;
private String message;
private T data;
public static AjaxResult success() {
return new AjaxResult<>(200, "操作成功", null);
}
public static AjaxResult success(T data) {
if (data != null) {
return new AjaxResult<>(200, "操作成功", data);
}
return new AjaxResult<>(200, "操作成功", null);
}
public static AjaxResult error(String message) {
return new AjaxResult<>(500, message, null);
}
public static AjaxResult error(Integer code, String message) {
return new AjaxResult<>(code, message, null);
}
}
```
#### 2.自定义BlockException
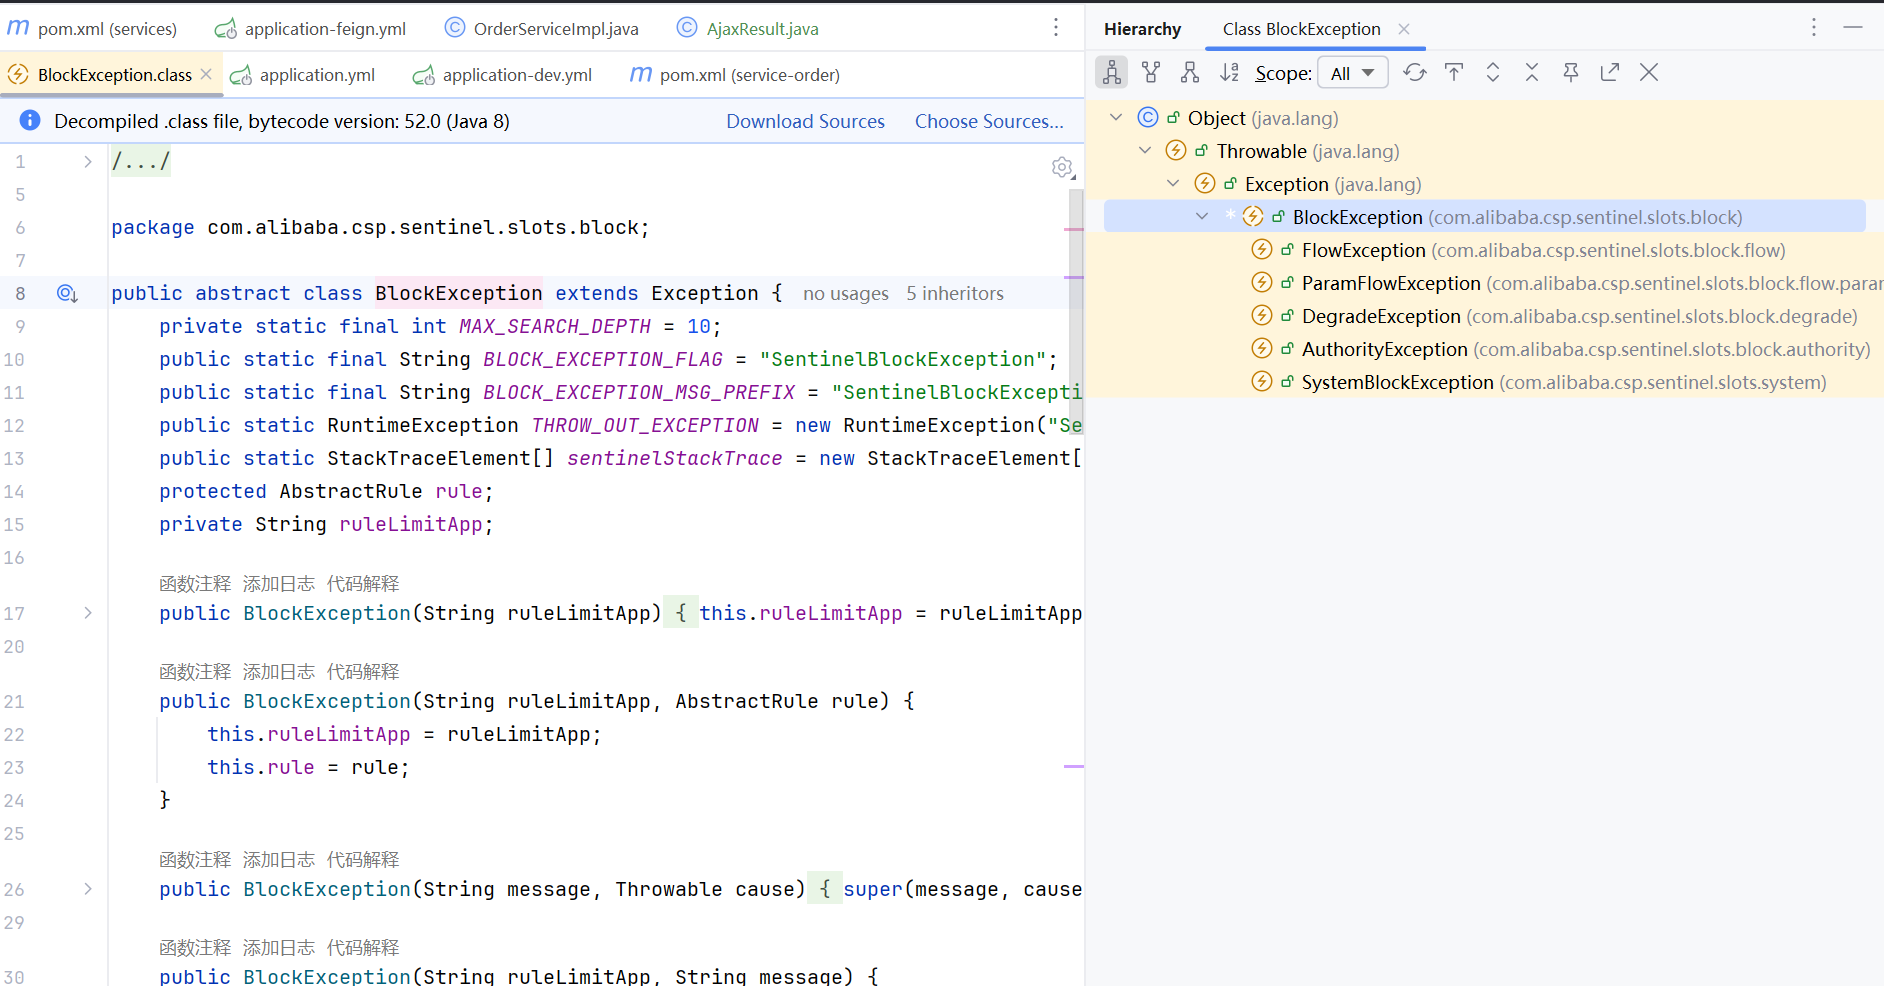
资源被限流后,报出的异常就是这个类抛出的,而捕获该异常的类为`BlockExceptionHandler`,只需自定义一个子类并加入容器即可生效。
```java
@Component
public class CustomBlockExceptionHandler implements BlockExceptionHandler {
@Override
public void handle(HttpServletRequest httpServletRequest,
HttpServletResponse httpServletResponse,
String resourceName,
BlockException e) throws Exception {
httpServletResponse.setContentType("application/json;charset=UTF-8");
PrintWriter writer = httpServletResponse.getWriter();
ObjectMapper objectMapper = new ObjectMapper();
AjaxResult
#### 3.查看资源

#### 4.设置流控


> `QPS:`单机每秒访问量
>
> `并发线程数:`单机每秒线程处理数量
这里设置为`单机每秒`只能处理`1`个请求

#### 5.重启测试

`当你快速刷新时,便会报错,需要注意:如果电脑处理快,可以把每秒处理的请求放多一点,比如设置为5,疯狂刷新浏览器,超过5次就会报错`
### 处理web异常
#### 1.定义统一资源返回对象
`放置在model模块下即可`
```java
@Data
@Builder
@NoArgsConstructor
@AllArgsConstructor
@ToString
public class AjaxResult {
private Integer code;
private String message;
private T data;
public static AjaxResult success() {
return new AjaxResult<>(200, "操作成功", null);
}
public static AjaxResult success(T data) {
if (data != null) {
return new AjaxResult<>(200, "操作成功", data);
}
return new AjaxResult<>(200, "操作成功", null);
}
public static AjaxResult error(String message) {
return new AjaxResult<>(500, message, null);
}
public static AjaxResult error(Integer code, String message) {
return new AjaxResult<>(code, message, null);
}
}
```
#### 2.自定义BlockException

资源被限流后,报出的异常就是这个类抛出的,而捕获该异常的类为`BlockExceptionHandler`,只需自定义一个子类并加入容器即可生效。
```java
@Component
public class CustomBlockExceptionHandler implements BlockExceptionHandler {
@Override
public void handle(HttpServletRequest httpServletRequest,
HttpServletResponse httpServletResponse,
String resourceName,
BlockException e) throws Exception {
httpServletResponse.setContentType("application/json;charset=UTF-8");
PrintWriter writer = httpServletResponse.getWriter();
ObjectMapper objectMapper = new ObjectMapper();
AjaxResult